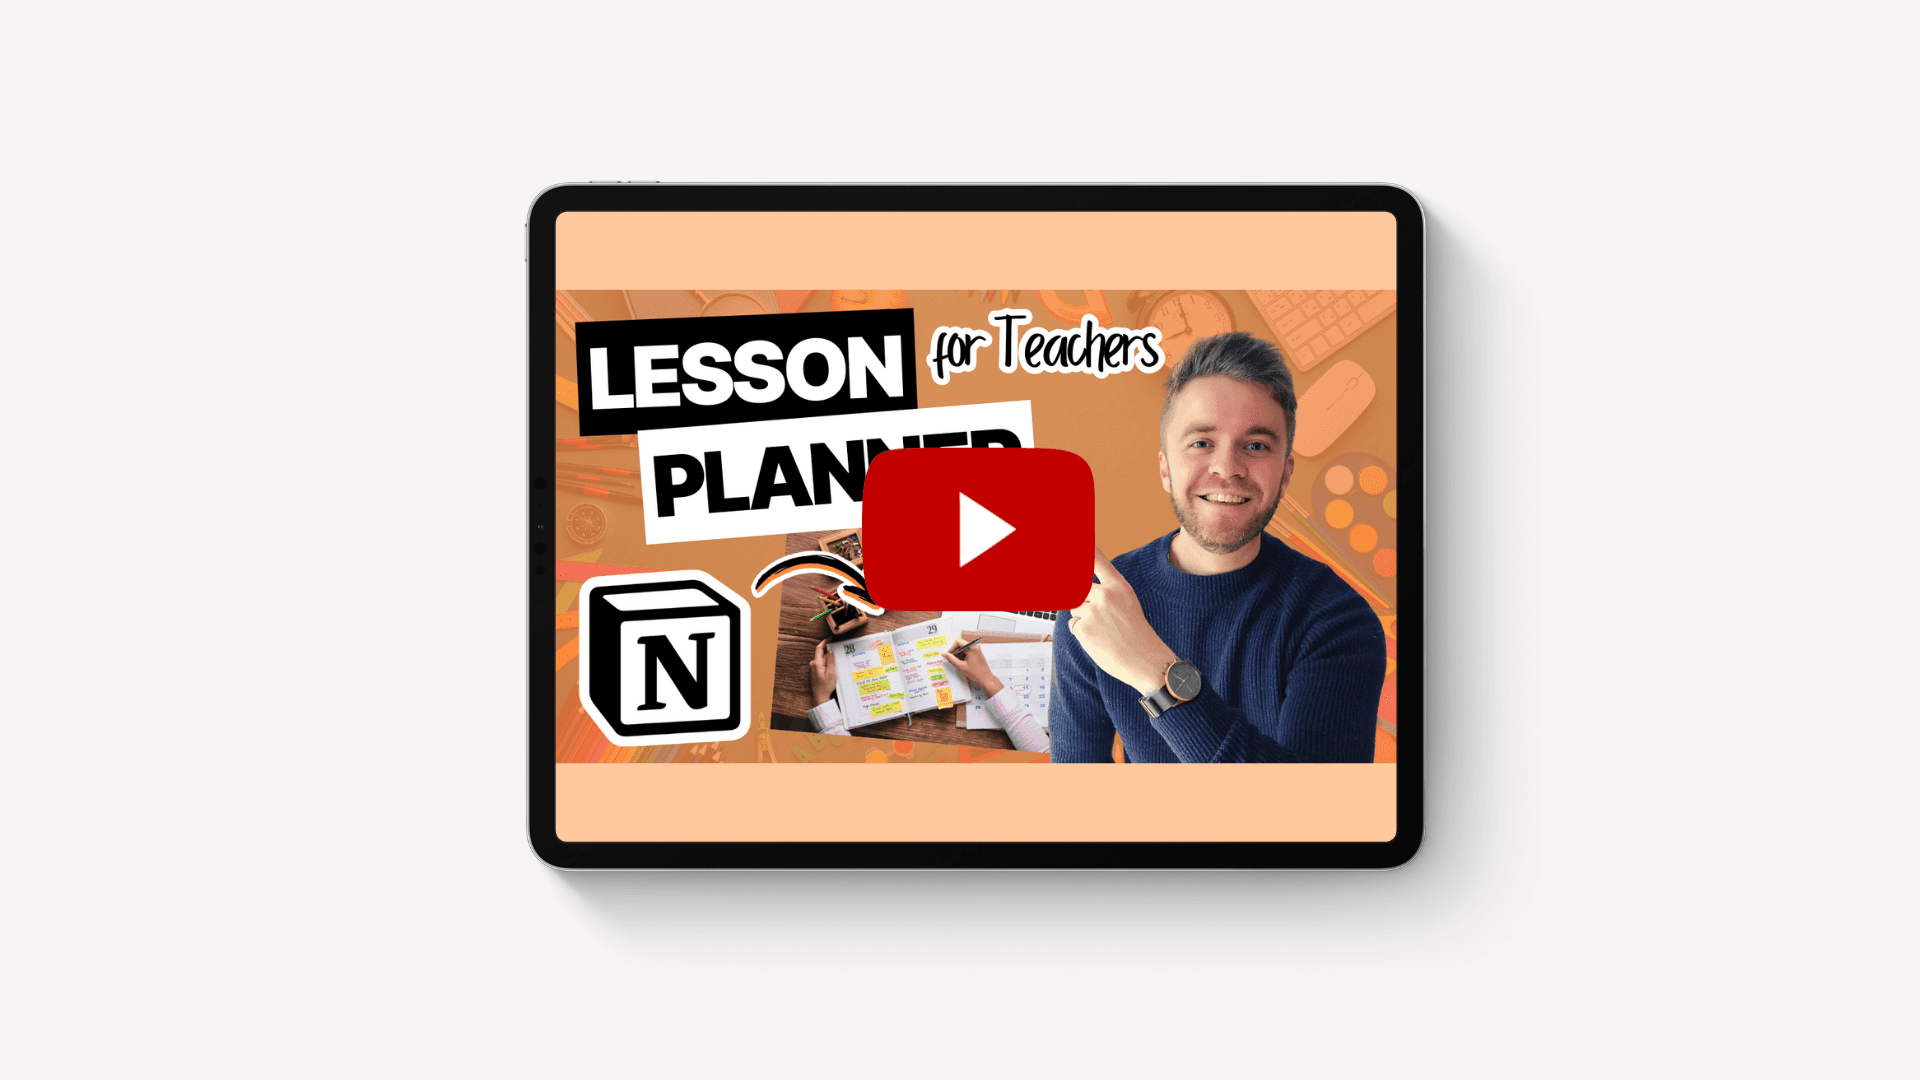

How to Create a Lesson Planner with Notion
How to Create a Lesson Planner with Notion
How to Create a Lesson Planner with Notion

Article by
Milo
ESL Content Coordinator & Educator
ESL Content Coordinator & Educator
All Posts
As teachers, we're no strangers to the challenges of lesson planning. It's a task that can often feel like a colossal headache, especially when juggling multiple classes and subjects. Without an efficient system for organizing our lesson plans, things can quickly become overwhelming.
Enter Notion, a game-changer in the world of online planners. Unlike its counterparts, Notion offers a superior platform for lesson planning, boasting an all-in-one workspace equipped with customizable templates, integrated task management, and a flexible interface. This makes it not only functional but also incredibly easy to use for educators.
In this blog post, we're going to take you through the process step-by-step, showing you how to harness the power of Notion to create your very own lesson planner. This planner isn't just about functionality; it's about adaptability. You can tailor it to match your unique teaching style, ensuring that your lesson planning becomes a breeze.
If you want to skip the guide and download the free Notion lesson planner, click here:
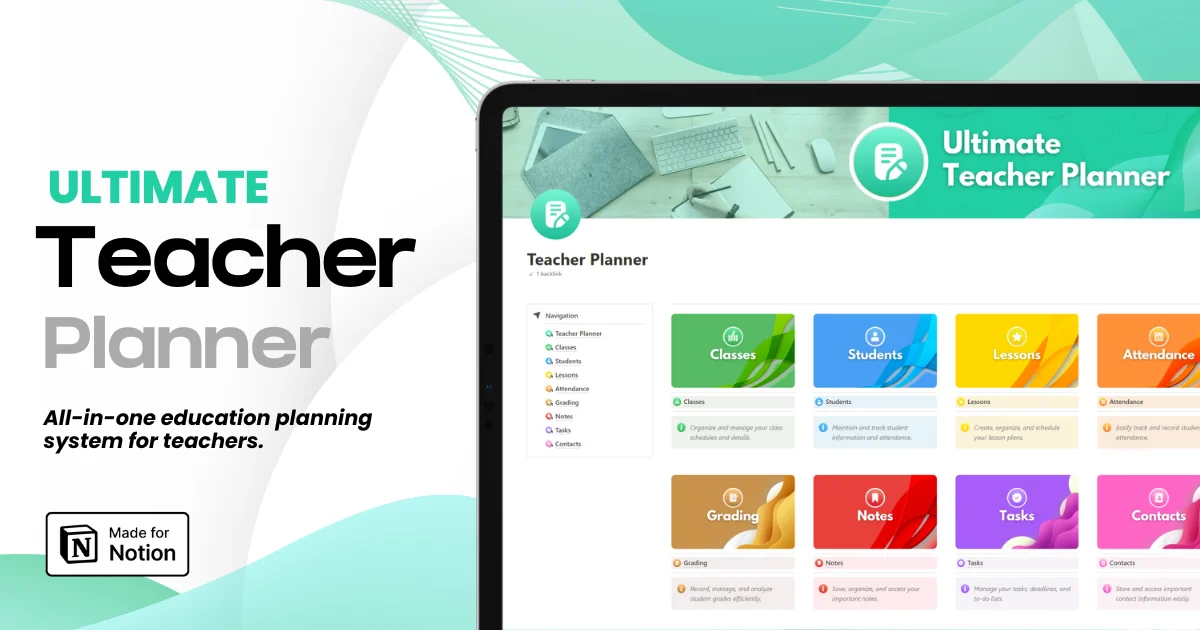
Ultimate Teacher Planner
The ultimate all-in-one education management system in Notion.
Learn More
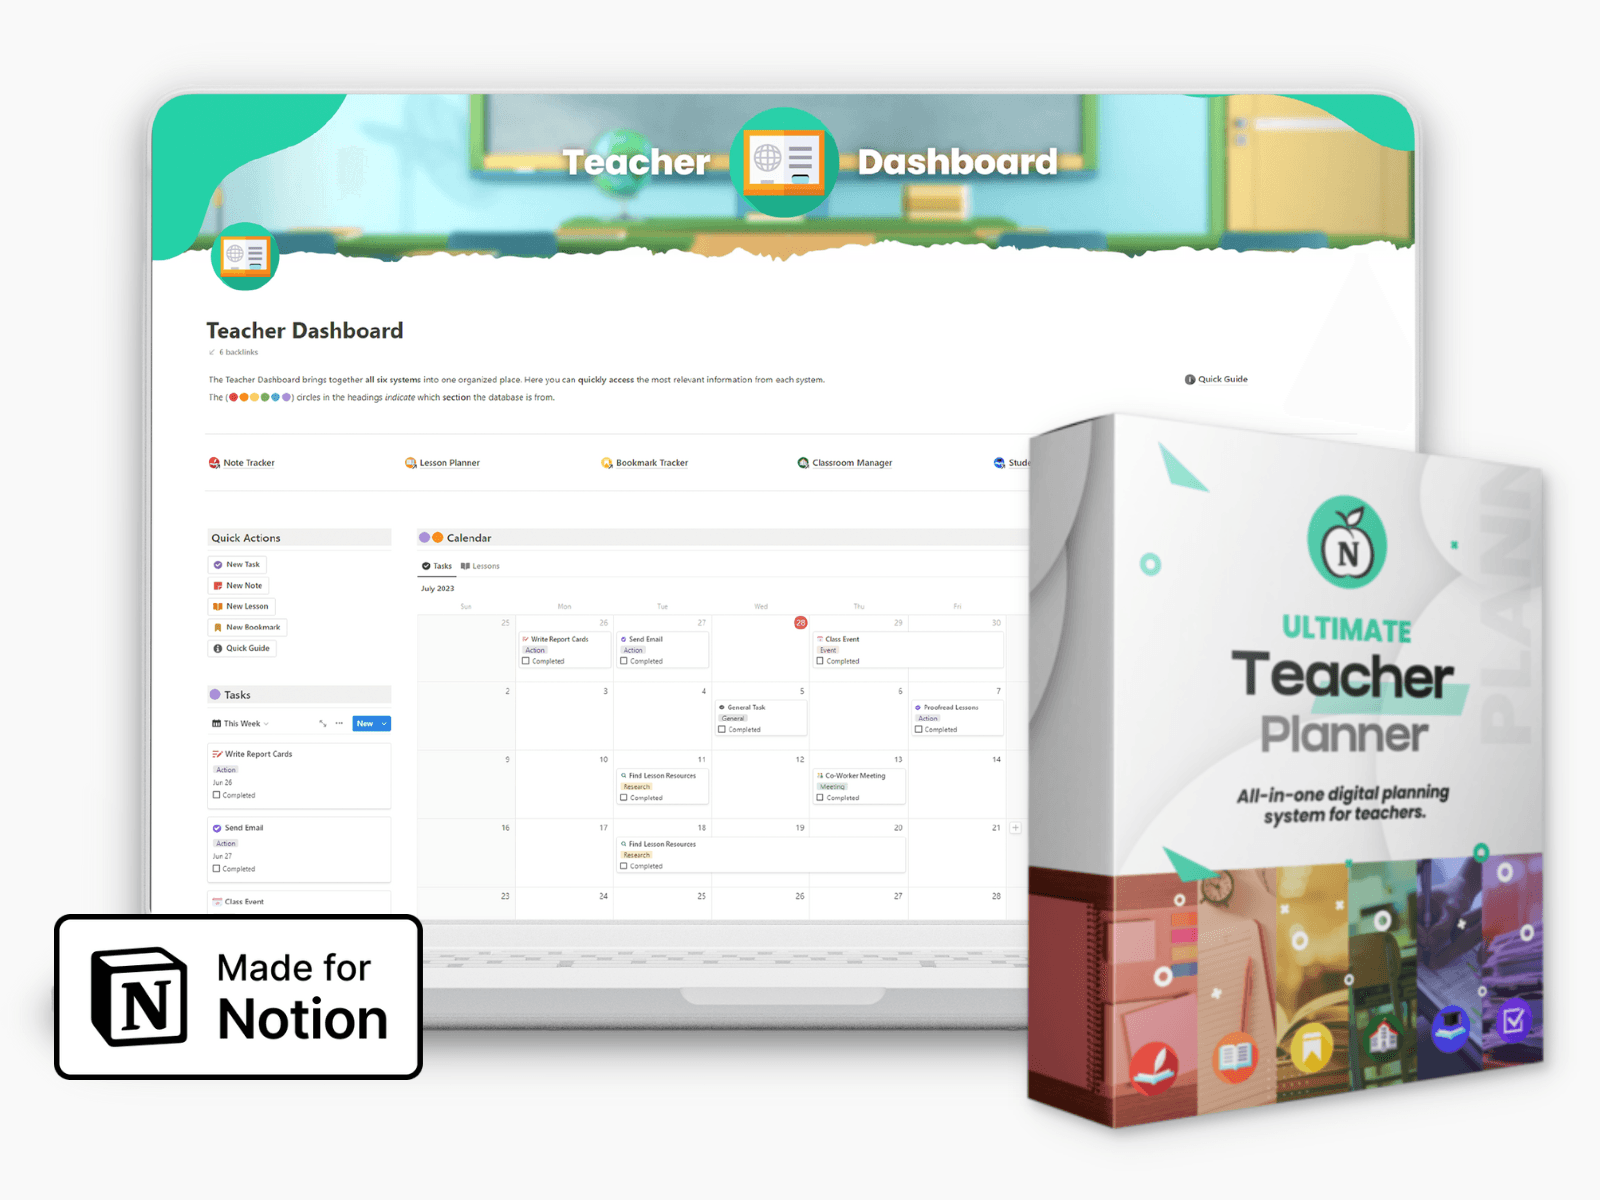
Ultimate Teacher Planner
The ultimate all-in-one education management system in Notion.
Learn More

Ultimate Teacher Planner
The ultimate all-in-one education management system in Notion.
Learn More

Section 1: Introduction to Notion Lesson Planner
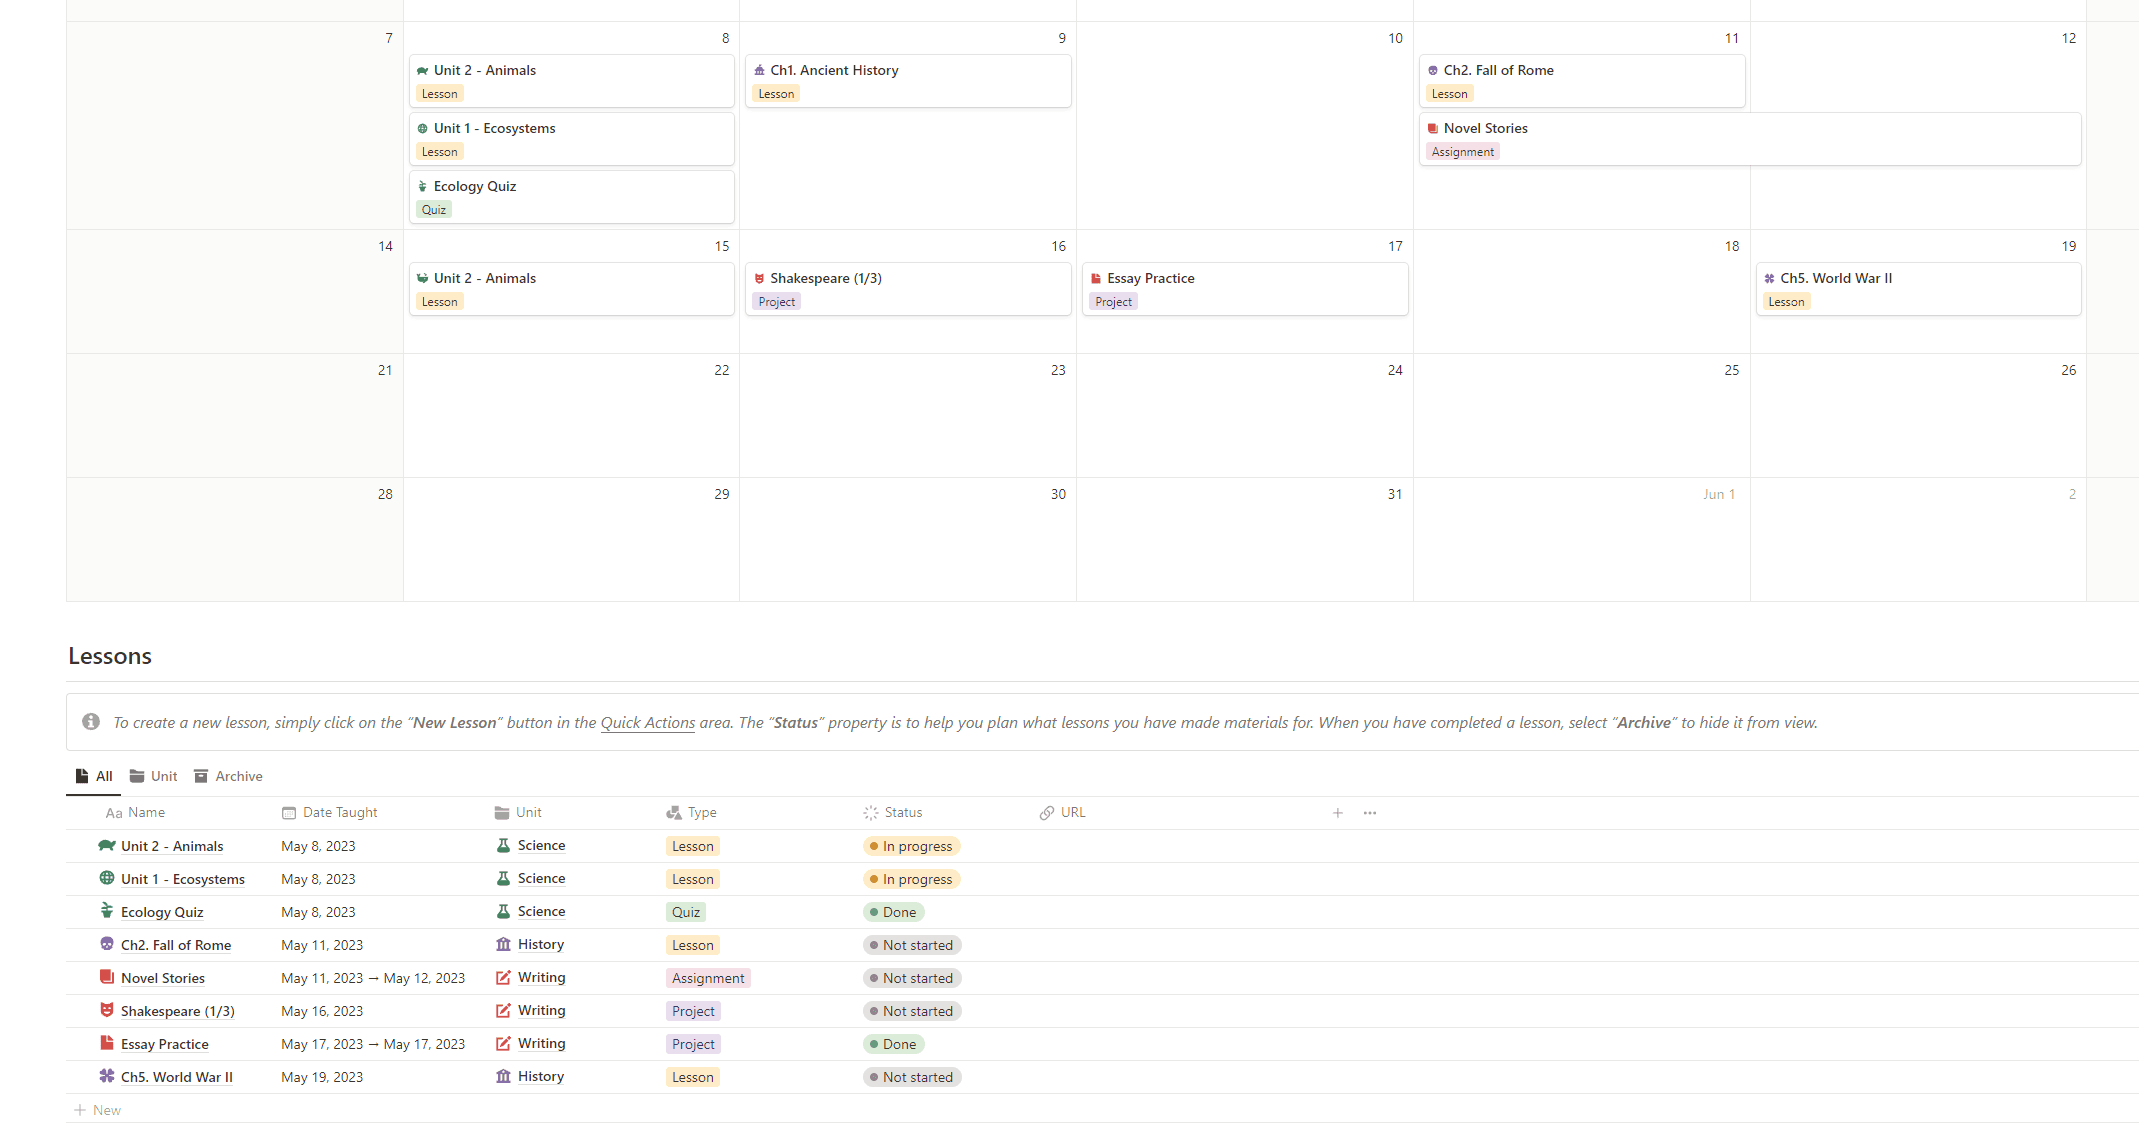
Welcome to the world of Notion, where lesson planning becomes a breeze. In this section, we'll introduce you to the concept of using Notion for lesson planning and highlight its advantages for educators.
Why Choose Notion for Lesson Planning:
Notion serves as a versatile all-in-one workspace designed to meet the specific needs of educators.
It offers customizable templates, integrated task management, and a flexible interface.
Notion simplifies the organization, tracking, and adaptation of lesson plans, making it a superior choice for teachers.
The Purpose of This Guide:
In this guide, we will provide a step-by-step tutorial to help you set up your own lesson planner in Notion.
You'll learn how to create a system that's not just functional but adaptable to your unique teaching style and subject matter.
Whether you're a seasoned educator or just starting, Notion can revolutionize your lesson planning process.
Ready to Get Started?
Let's dive into the world of Notion and discover how it can transform your lesson planning experience. In the following sections, we will walk you through the essential steps to build your Notion-based lesson planner from scratch.
Section 2: Setting Up Your Notion Workspace
In this section, we'll guide you through the initial steps of building your lesson planner in Notion. These foundational steps will help you create an organized workspace for your lesson plans.
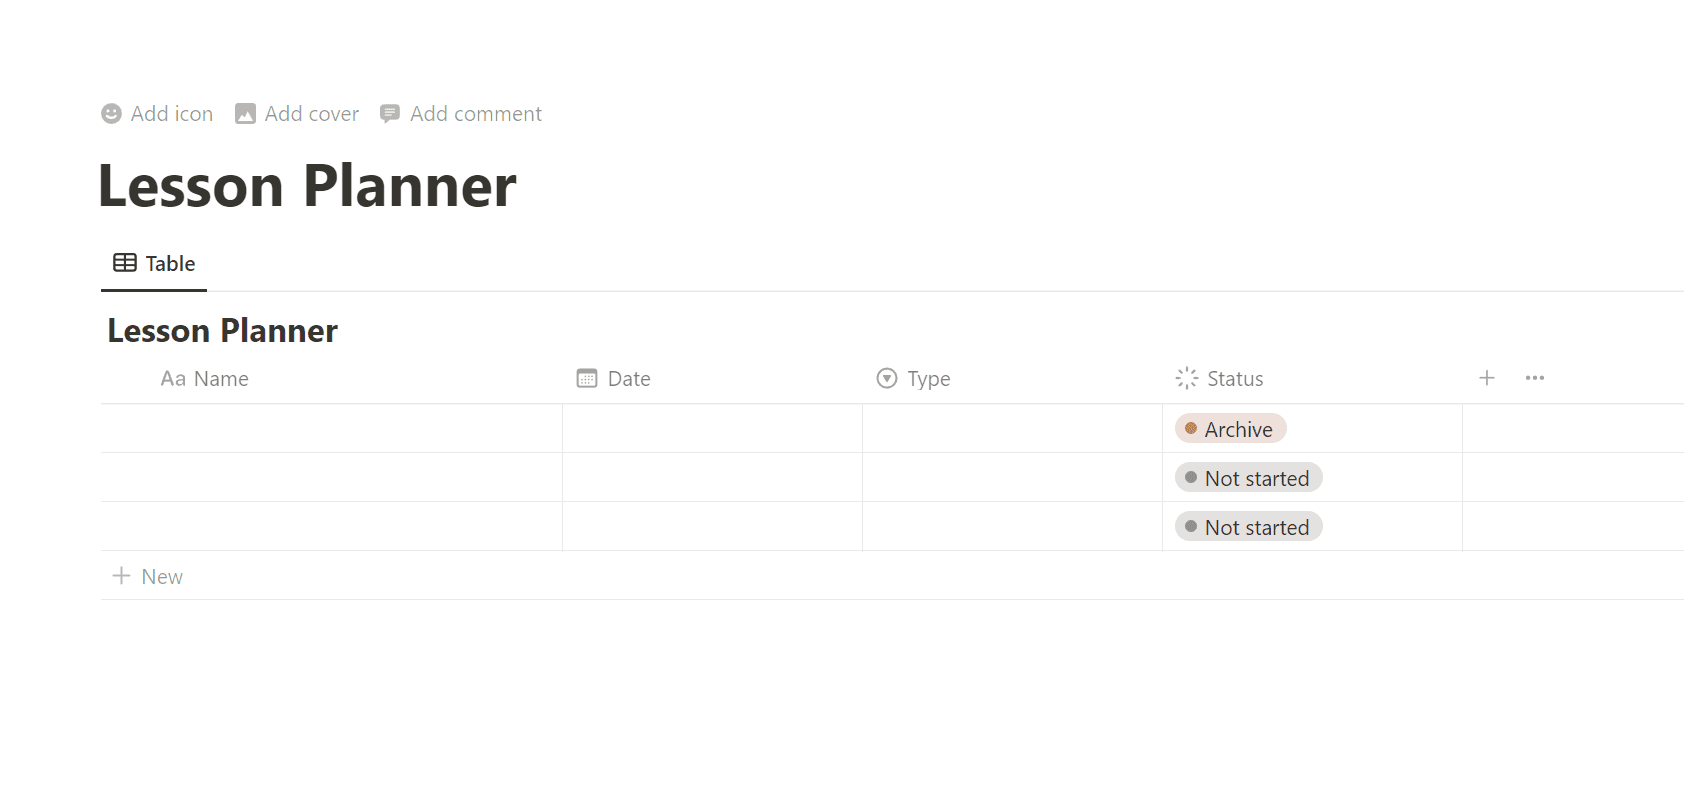
Step 1: Create a New Page for Your Lesson Planner
Launch Notion and start by creating a new page dedicated to your lesson planner. Give it a descriptive title like "Lesson Planner."
To optimize your workspace, maximize the screen by switching to full-screen mode.
Step 2: Create the "Lessons" Database
Your lesson planner begins with the creation of a database to store your lessons. To do this:
Utilize the slash command within Notion.
Type "data" and select "inline database."
Name this database "Lessons" and declutter it by removing any unnecessary tags.
Step 3: Add Essential Properties
A well-structured lesson planner relies on key properties. Begin by adding these properties:
Date Property: To specify the date for each lesson.
Select Property: To categorize lesson types (e.g., project, assignment).
Status Property: To track lesson preparation and completion.
Archive Status Property: For archiving lessons without deleting them.
Step 4: Customize Your Lesson Database
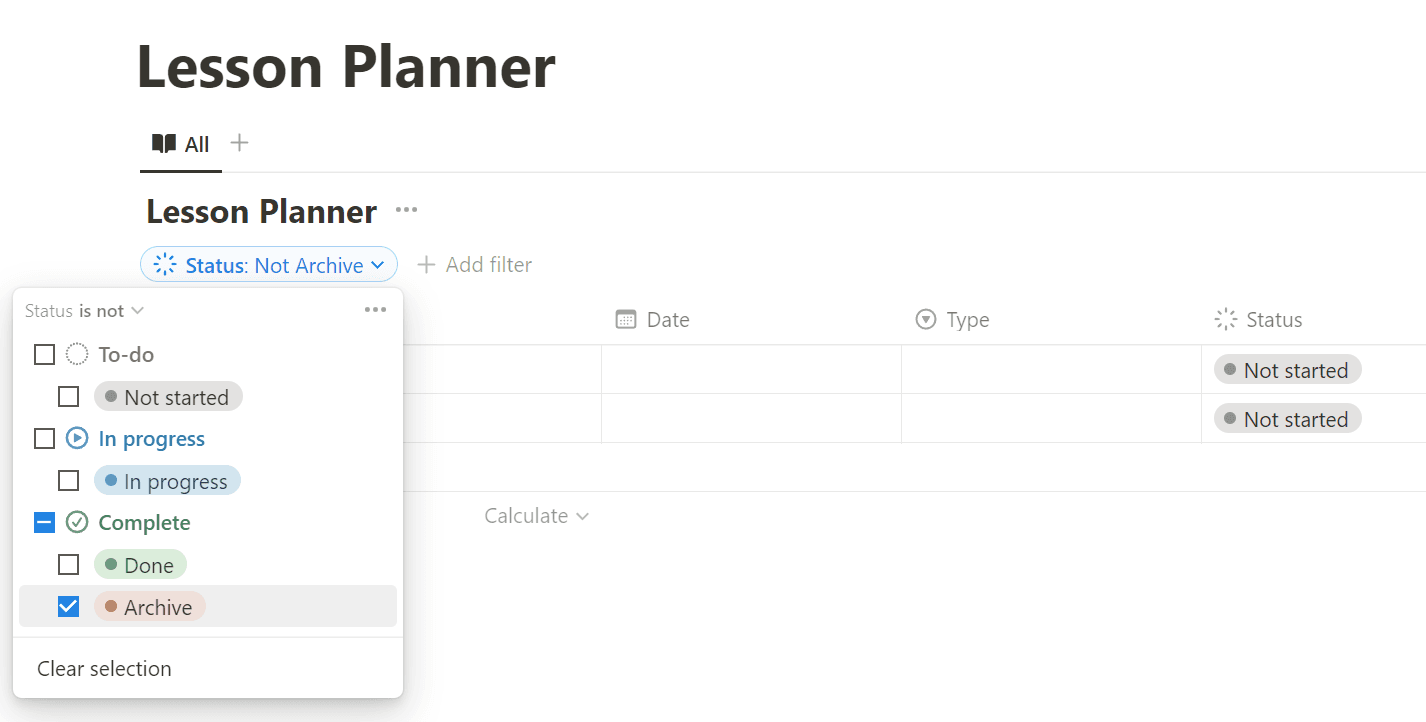
Start building your lesson database by:
Adding your first lesson with a title, date, and lesson type.
Enhancing the database layout by renaming the view to "All" and incorporating a custom icon.
Setting up a custom filter to display only lessons without the "Archive" status.
With these foundational steps, your Notion workspace is ready to host your lesson plans. In the following sections, we will delve deeper into customizing and organizing your lesson planner to suit your unique teaching needs.
Section 3: Organizing Lessons with Units
In this section, we'll introduce the concept of lesson units and guide you through setting up your Notion lesson planner for improved organization and structure.
Step 1: Create a New Database for Lesson Units
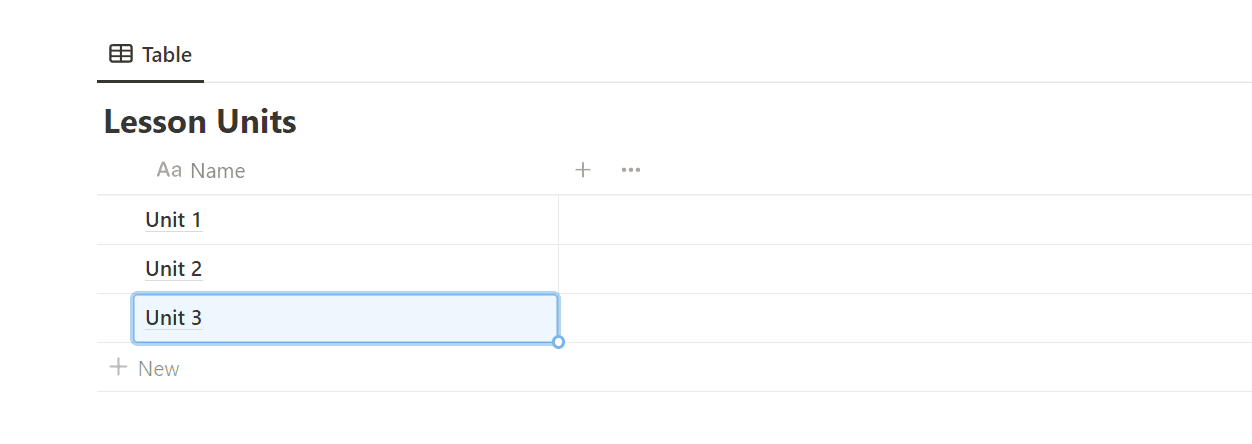
Begin by establishing a separate database for lesson units. This will help you organize lessons more effectively.
Create a new inline database and name it "Lesson Units." Streamline your workspace by removing any superfluous tags or properties.
Step 2: Establish a Connection Between Lessons and Units
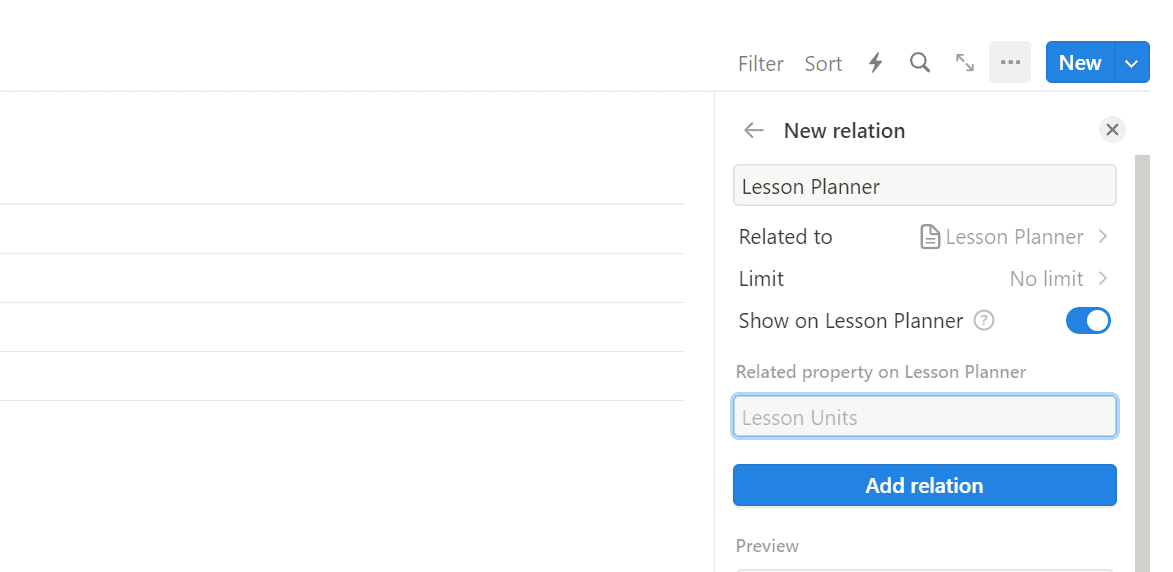
Ensure seamless communication between your "Lessons" database and "Lesson Units." Follow these steps:
Add a relation property to your "Lesson Units" database and link it to the "Lessons" database.
Activate the "show on lessons" option to enable two-way communication between the two databases.
Enhance the aesthetics by customizing the icon.
Step 3: Clean Up the Lesson Units Database
Maintain an organized workspace by removing any blank entries from your "Lesson Units" database.
Start by providing your first lesson unit with an appropriate title.
Step 4: Group Lessons Using Units
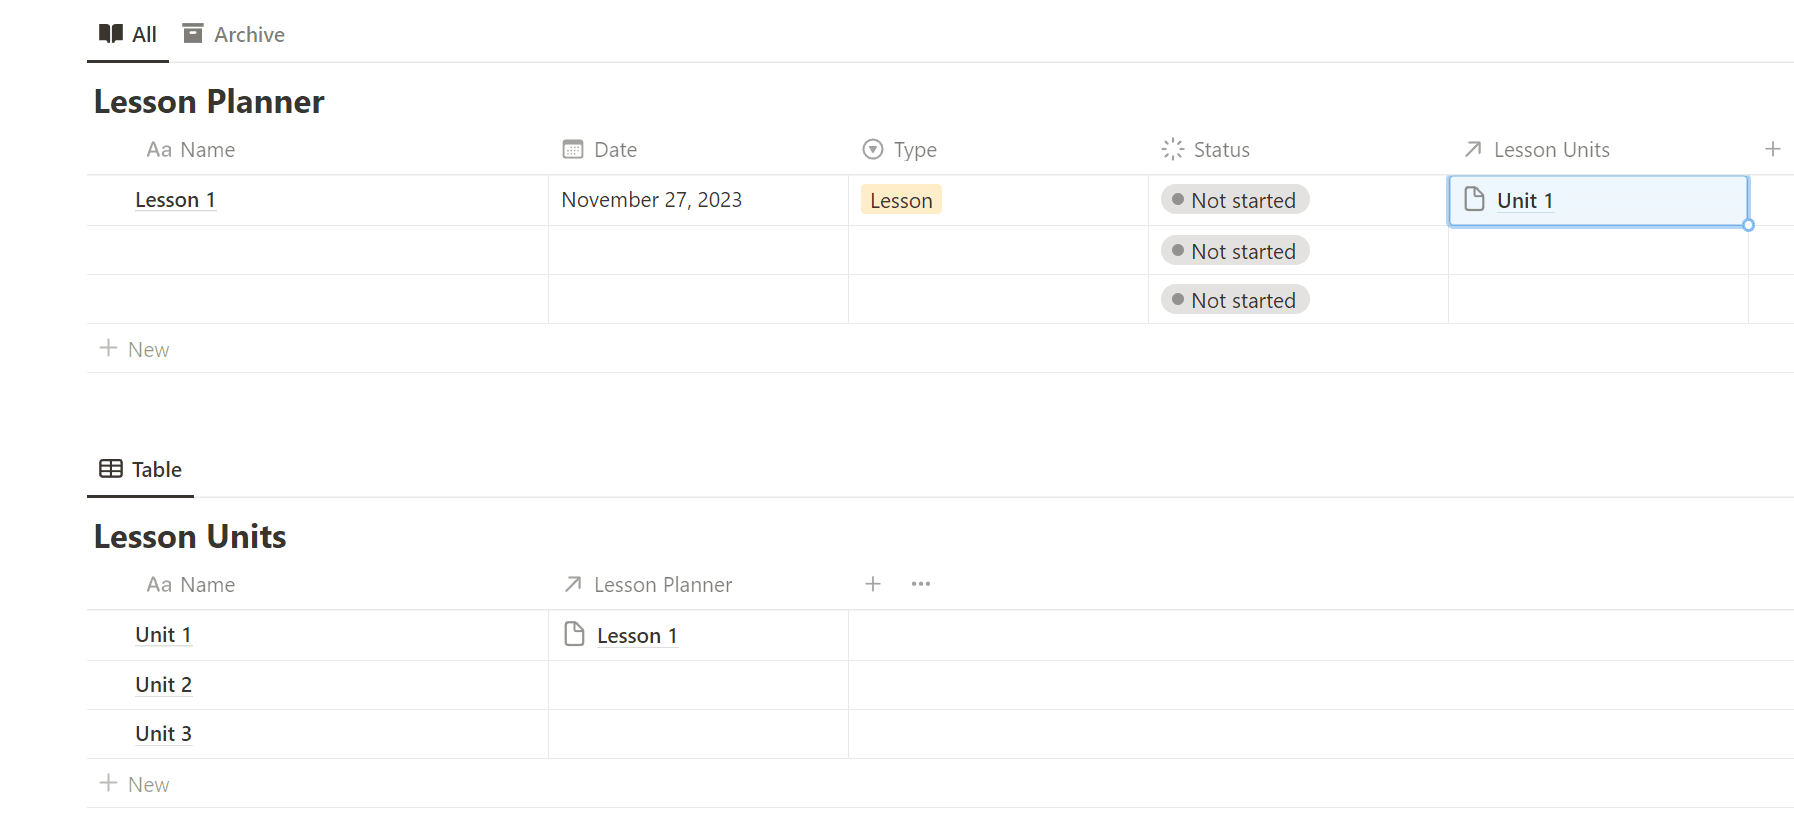
Now that your databases are interconnected, you can seamlessly group lessons into units:
Select lessons from the "Lessons" database and tag them to specific units.
Observe how lessons linked to specific units appear simultaneously in both databases.
This feature enables efficient tagging and grouping of lessons for improved organization and accessibility.
With the implementation of lesson units, your Notion lesson planner gains structure and coherence. It's an ideal solution, especially if you teach multiple classes or subjects, as it simplifies the management of your lesson plans. Continue reading to explore further ways to optimize your Notion lesson planner.
Section 4: Formatting Your Workspace
In this section, we'll focus on enhancing the aesthetics and organization of your Notion lesson planner. A clean and visually appealing layout can make a significant difference in your lesson planning experience.
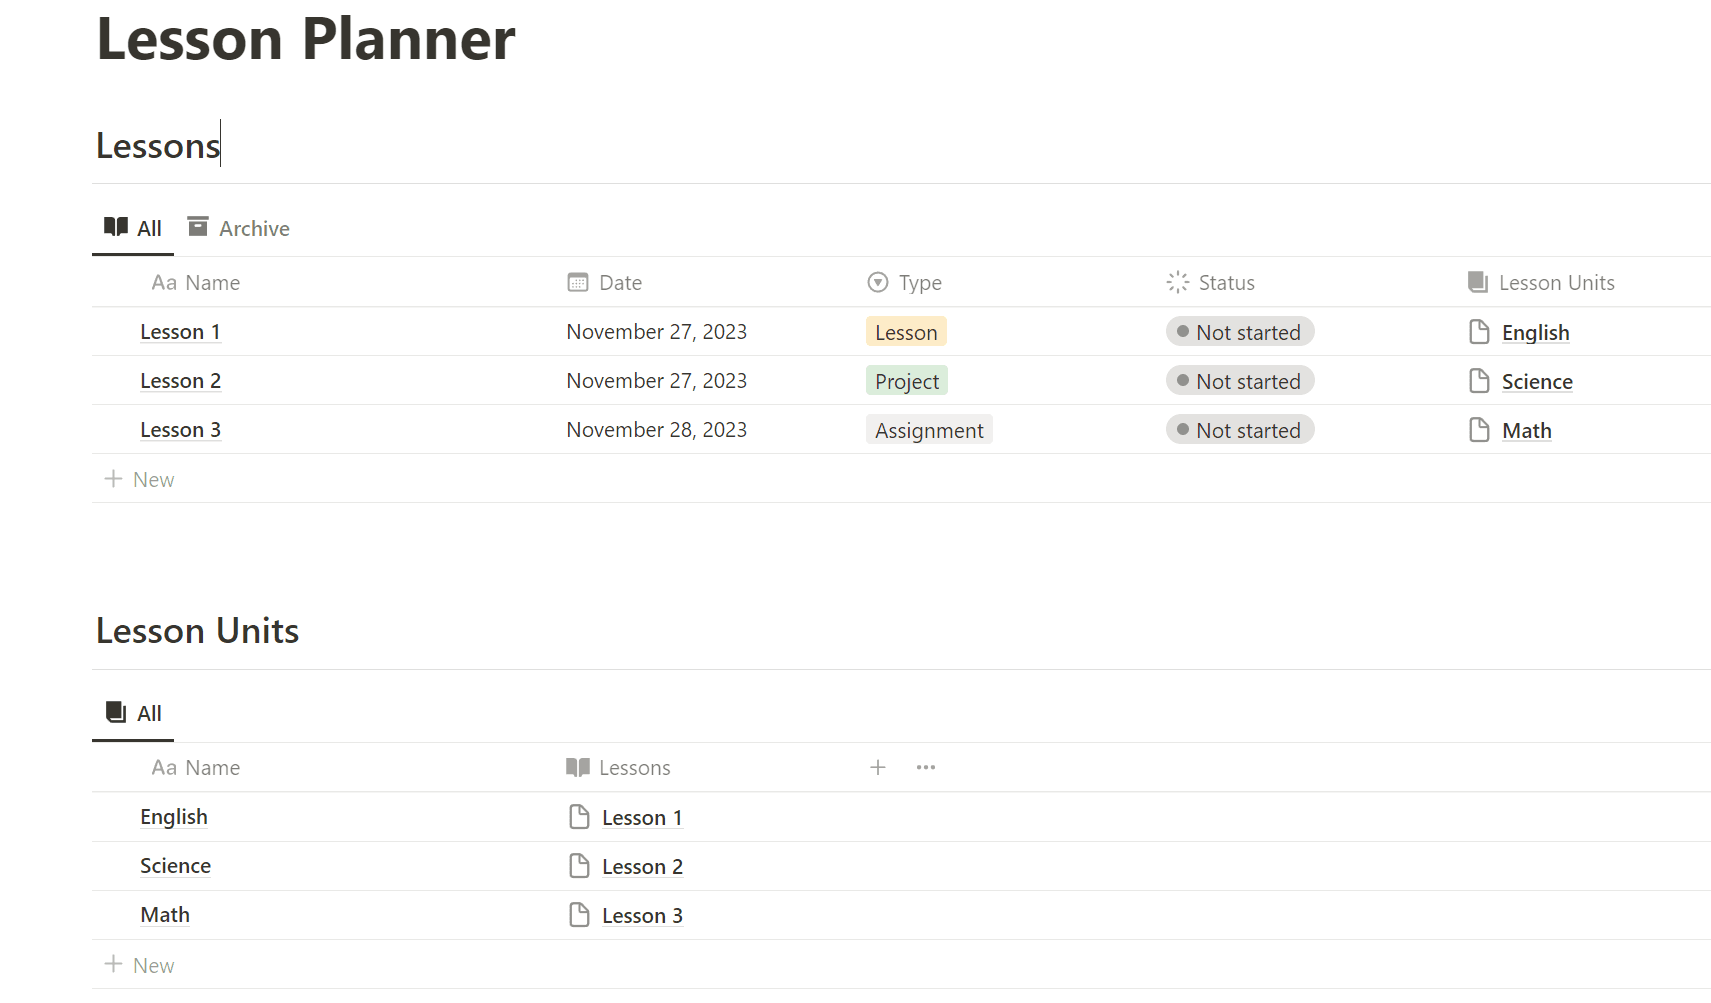
Step 1: Streamline Database Layout
Begin by adjusting the placement of your "Lessons" and "Lesson Units" databases for better organization and visual appeal.
Provide each database with its own title and divider to improve clarity and structure.
Step 2: Customize Database Layout Settings
Customize the database layout settings to create a cleaner workspace:
Deselect the "database title" to simplify the view.
Turn off "vertical lines" to reduce clutter.
Opt for "wrap all columns" to create a more visually pleasing display.
Step 3: Utilize Notion's Magic for Linked Views
Harness Notion's capabilities to create linked views that display lessons tagged to each unit efficiently:
Go to the "Lessons" database, click the six dots on the left, and select "copy link."
Open a lesson unit page, create a template with a title (e.g., "New Unit"), and choose a custom icon.
Paste the copied database into the template using "create linked view of the database."
Step 4: Filter Lessons for Each Unit
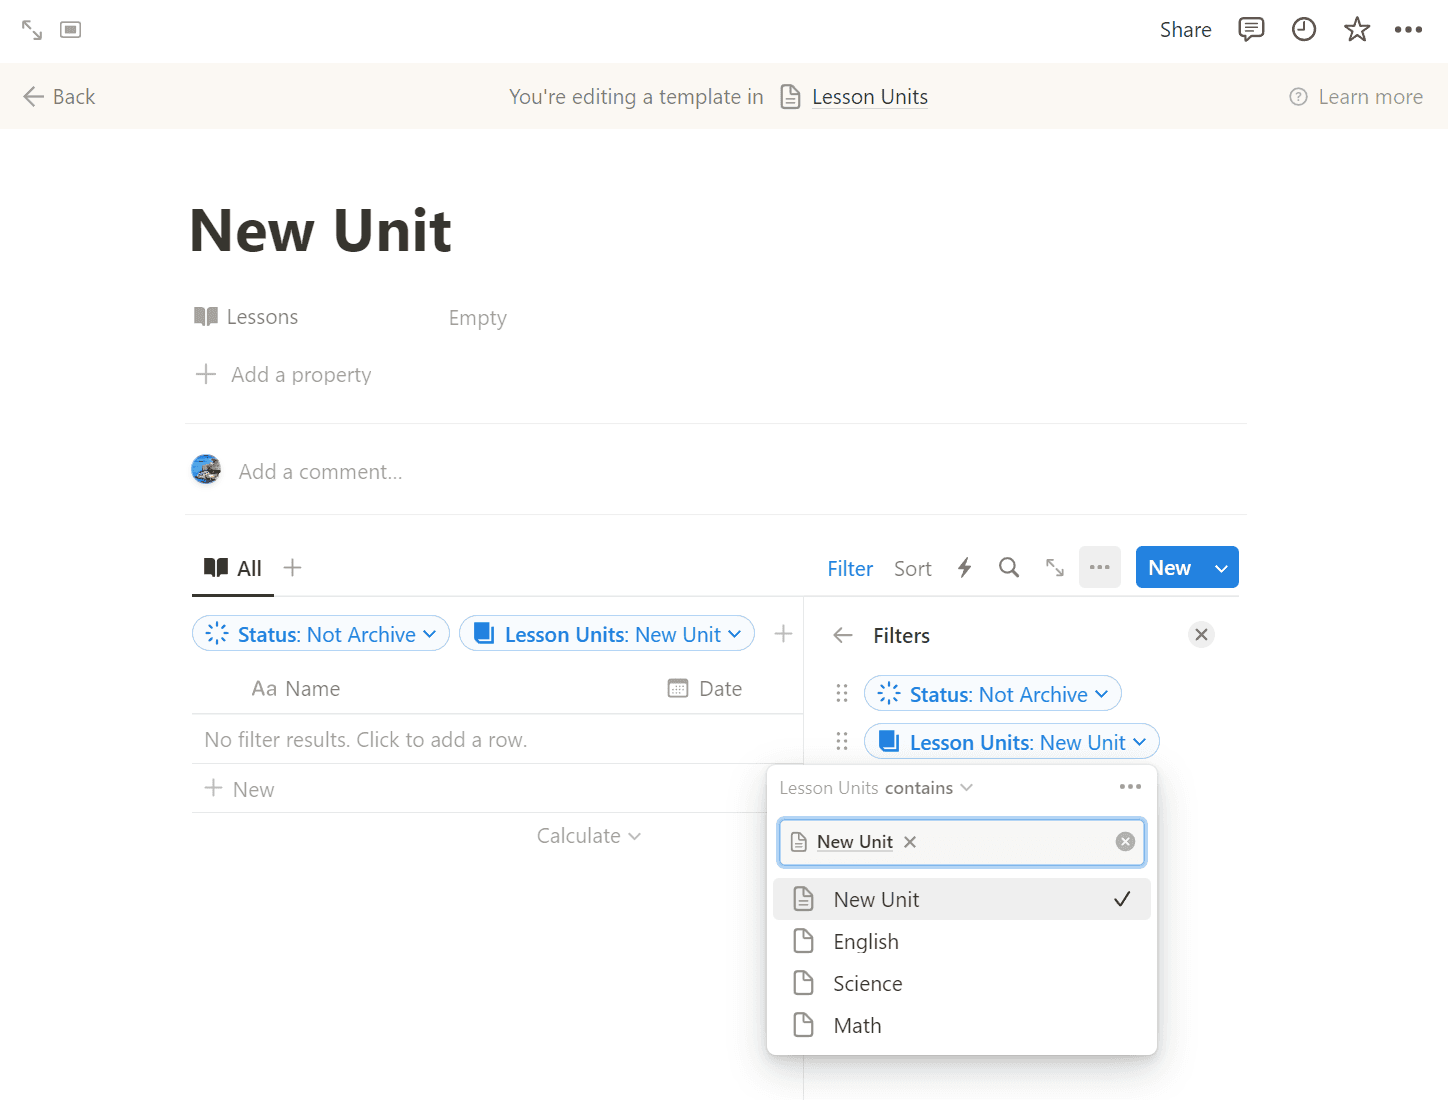
To maintain clarity and avoid redundancy, display only lessons tagged to a specific unit:
Add a filter by selecting "lesson unit" and choosing the corresponding unit's name.
Remove the lesson unit property from the view to keep it clean.
Adjust property sizes to create an organized and visually appealing appearance.
By following these steps, you'll not only improve the aesthetics of your Notion workspace but also enhance its efficiency. The linked views for lesson units and filtered views for lessons ensure that your lesson planner remains a joy to use. Continue reading to explore more ways to optimize your Notion lesson planner.
Section 5: Creating Lesson and Unit Templates
In this section, we'll explore the importance of templates in simplifying your lesson planning process. We'll guide you through creating and applying templates for both lessons and units.
Step 1: The Role of Templates
Templates are valuable tools that streamline the creation of consistent lessons and units.
They can serve as standard formats, scaffolds, or repositories for essential information and resources.
Step 2: Creating Lesson Templates
Start by creating templates for individual lessons:
Click on "Lesson" in your database and select "create new template."
Name the template (e.g., "New Lesson") and choose a custom icon.
Optionally, add any standardized lesson elements or resources you frequently use.
Step 3: Creating Unit Templates
Similarly, create templates for lesson units:
Click on "Lesson Units" in your database and select "create new template."
Name the template (e.g., "New Unit") and choose a custom icon.
You can leave this template mostly blank, as it serves as a placeholder for unit structure.
Step 4: Applying Templates
Ensure that templates are applied automatically to lessons and units for consistent planning:
In the database, click on the top right blue arrow and choose the respective template (e.g., "New Lesson" or "New Unit").
This way, when you create a new lesson unit or a new lesson, the template is applied by default.
Templates simplify your lesson planning process, ensuring uniformity and efficiency. They provide a structured framework to work from and save you time in creating repetitive elements. In the next section, we'll explore further enhancements to your Notion lesson planner.
Section 6: Sorting and Viewing Your Planner
In this section, we'll explore techniques to improve how you sort and view your Notion-based lesson planner. Efficient sorting and visualization are essential for a well-organized and user-friendly workspace.
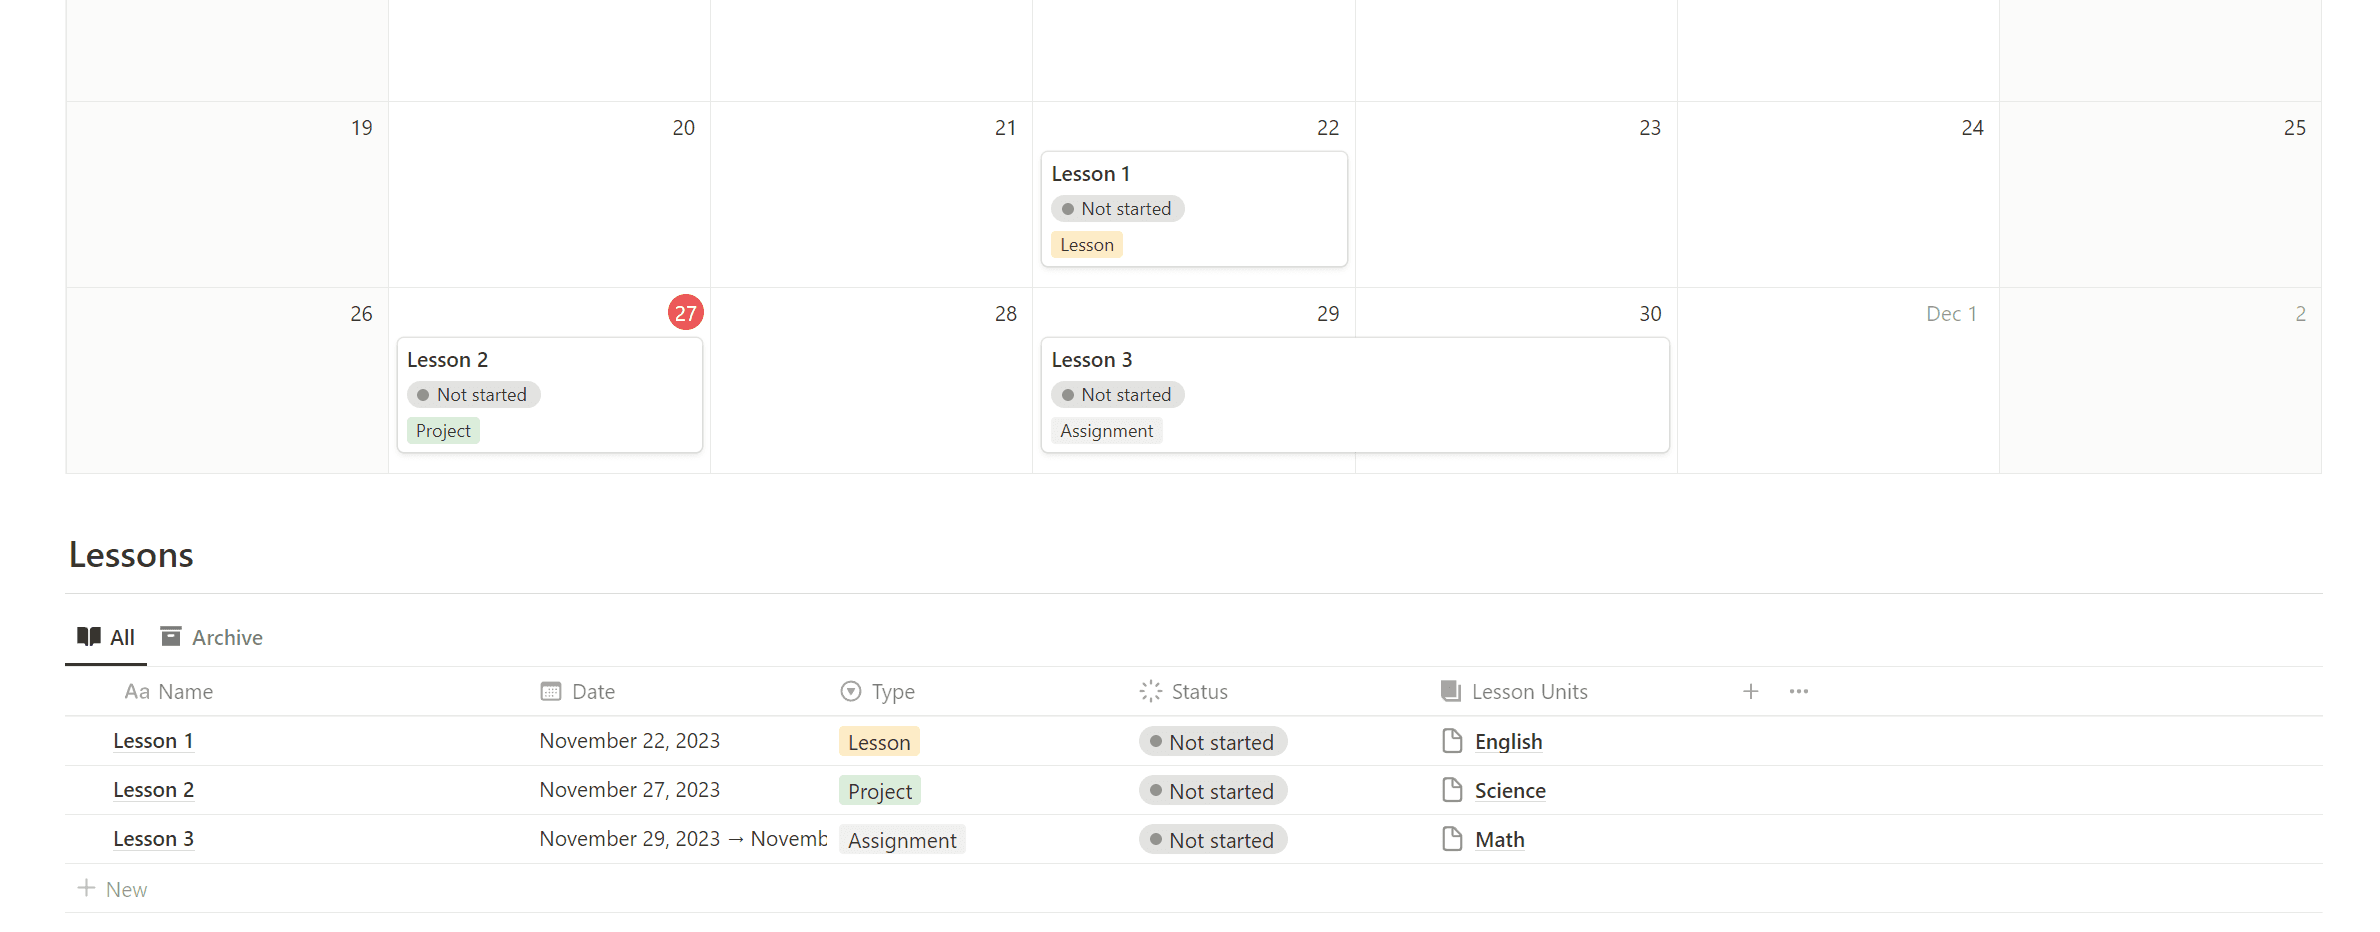
Step 1: Sorting Lessons by Date
One of the key benefits of digital lesson planning is the ability to sort by date.
To ensure that lessons are displayed in chronological order:
Navigate to your "Lessons" database and click on "sort."
Select "sort by date" to have lessons organized by their scheduled dates.
This keeps upcoming lessons easily accessible at the top of your database.
Step 2: Utilizing Calendar Views
Calendar views offer a visual overview of your lesson curriculum over time:
Go to your "Lessons" database, click on "copy link," and give it a title like "Calendar."
Access the layout options and select the "calendar view."
Your lessons will now be displayed on a calendar, making it easier to plan and visualize your teaching schedule.
Step 3: Streamlining Lesson Status Updates
Keep your lesson planner up to date by ensuring that changes in lesson status are reflected promptly:
Assign "done" or "archive" statuses to completed lessons directly from the calendar view.
By changing a lesson's status to "archive," it will be removed from the calendar, maintaining a clean and uncluttered workspace.
With these steps, you've improved the usability of your Notion lesson planner. Sorting lessons by date and utilizing calendar views provide a clear overview of your teaching schedule. Keeping your lesson statuses updated ensures that your planner remains accurate and up to date.
After years of teaching and lesson planning, this combination of spreadsheet-style organization and visual calendar views, along with the lesson unit folders, provides an efficient and headache-free way to manage your lessons. Notion's archive system also allows you to track and save lesson resources while keeping your workspace clean and easy to navigate.
For those interested in trying out the template created in this guide, a download link is available here.
Download Free Notion Lesson Planner
If you have any questions or would like further guidance on using Notion for teaching, please feel free to contact us. Thank you for joining us on this journey to improve your teaching through Notion!
Section 1: Introduction to Notion Lesson Planner
Welcome to the world of Notion, where lesson planning becomes a breeze. In this section, we'll introduce you to the concept of using Notion for lesson planning and highlight its advantages for educators.

Why Choose Notion for Lesson Planning:
Notion serves as a versatile all-in-one workspace designed to meet the specific needs of educators.
It offers customizable templates, integrated task management, and a flexible interface.
Notion simplifies the organization, tracking, and adaptation of lesson plans, making it a superior choice for teachers.
The Purpose of This Guide:
In this guide, we will provide a step-by-step tutorial to help you set up your own lesson planner in Notion.
You'll learn how to create a system that's not just functional but adaptable to your unique teaching style and subject matter.
Whether you're a seasoned educator or just starting, Notion can revolutionize your lesson planning process.
Ready to Get Started?
Let's dive into the world of Notion and discover how it can transform your lesson planning experience. In the following sections, we will walk you through the essential steps to build your Notion-based lesson planner from scratch.
Section 2: Setting Up Your Notion Workspace
In this section, we'll guide you through the initial steps of building your lesson planner in Notion. These foundational steps will help you create an organized workspace for your lesson plans.

Step 1: Create a New Page for Your Lesson Planner
Launch Notion and start by creating a new page dedicated to your lesson planner. Give it a descriptive title like "Lesson Planner."
To optimize your workspace, maximize the screen by switching to full-screen mode.
Step 2: Create the "Lessons" Database
Your lesson planner begins with the creation of a database to store your lessons. To do this:
Utilize the slash command within Notion.
Type "data" and select "inline database."
Name this database "Lessons" and declutter it by removing any unnecessary tags.
Step 3: Add Essential Properties
A well-structured lesson planner relies on key properties. Begin by adding these properties:
Date Property: To specify the date for each lesson.
Select Property: To categorize lesson types (e.g., project, assignment).
Status Property: To track lesson preparation and completion.
Archive Status Property: For archiving lessons without deleting them.
Step 4: Customize Your Lesson Database

Start building your lesson database by:
Adding your first lesson with a title, date, and lesson type.
Enhancing the database layout by renaming the view to "All" and incorporating a custom icon.
Setting up a custom filter to display only lessons without the "Archive" status.
With these foundational steps, your Notion workspace is ready to host your lesson plans. In the following sections, we will delve deeper into customizing and organizing your lesson planner to suit your unique teaching needs.
Section 3: Organizing Lessons with Units
In this section, we'll introduce the concept of lesson units and guide you through setting up your Notion lesson planner for improved organization and structure.
Step 1: Create a New Database for Lesson Units

Begin by establishing a separate database for lesson units. This will help you organize lessons more effectively.
Create a new inline database and name it "Lesson Units." Streamline your workspace by removing any superfluous tags or properties.
Step 2: Establish a Connection Between Lessons and Units

Ensure seamless communication between your "Lessons" database and "Lesson Units." Follow these steps:
Add a relation property to your "Lesson Units" database and link it to the "Lessons" database.
Activate the "show on lessons" option to enable two-way communication between the two databases.
Enhance the aesthetics by customizing the icon.
Step 3: Clean Up the Lesson Units Database
Maintain an organized workspace by removing any blank entries from your "Lesson Units" database.
Start by providing your first lesson unit with an appropriate title.
Step 4: Group Lessons Using Units

Now that your databases are interconnected, you can seamlessly group lessons into units:
Select lessons from the "Lessons" database and tag them to specific units.
Observe how lessons linked to specific units appear simultaneously in both databases.
This feature enables efficient tagging and grouping of lessons for improved organization and accessibility.
With the implementation of lesson units, your Notion lesson planner gains structure and coherence. It's an ideal solution, especially if you teach multiple classes or subjects, as it simplifies the management of your lesson plans. Continue reading to explore further ways to optimize your Notion lesson planner.
Section 4: Formatting Your Workspace
In this section, we'll focus on enhancing the aesthetics and organization of your Notion lesson planner. A clean and visually appealing layout can make a significant difference in your lesson planning experience.

Step 1: Streamline Database Layout
Begin by adjusting the placement of your "Lessons" and "Lesson Units" databases for better organization and visual appeal.
Provide each database with its own title and divider to improve clarity and structure.
Step 2: Customize Database Layout Settings
Customize the database layout settings to create a cleaner workspace:
Deselect the "database title" to simplify the view.
Turn off "vertical lines" to reduce clutter.
Opt for "wrap all columns" to create a more visually pleasing display.
Step 3: Utilize Notion's Magic for Linked Views
Harness Notion's capabilities to create linked views that display lessons tagged to each unit efficiently:
Go to the "Lessons" database, click the six dots on the left, and select "copy link."
Open a lesson unit page, create a template with a title (e.g., "New Unit"), and choose a custom icon.
Paste the copied database into the template using "create linked view of the database."
Step 4: Filter Lessons for Each Unit

To maintain clarity and avoid redundancy, display only lessons tagged to a specific unit:
Add a filter by selecting "lesson unit" and choosing the corresponding unit's name.
Remove the lesson unit property from the view to keep it clean.
Adjust property sizes to create an organized and visually appealing appearance.
By following these steps, you'll not only improve the aesthetics of your Notion workspace but also enhance its efficiency. The linked views for lesson units and filtered views for lessons ensure that your lesson planner remains a joy to use. Continue reading to explore more ways to optimize your Notion lesson planner.
Section 5: Creating Lesson and Unit Templates
In this section, we'll explore the importance of templates in simplifying your lesson planning process. We'll guide you through creating and applying templates for both lessons and units.
Step 1: The Role of Templates
Templates are valuable tools that streamline the creation of consistent lessons and units.
They can serve as standard formats, scaffolds, or repositories for essential information and resources.
Step 2: Creating Lesson Templates
Start by creating templates for individual lessons:
Click on "Lesson" in your database and select "create new template."
Name the template (e.g., "New Lesson") and choose a custom icon.
Optionally, add any standardized lesson elements or resources you frequently use.
Step 3: Creating Unit Templates
Similarly, create templates for lesson units:
Click on "Lesson Units" in your database and select "create new template."
Name the template (e.g., "New Unit") and choose a custom icon.
You can leave this template mostly blank, as it serves as a placeholder for unit structure.
Step 4: Applying Templates
Ensure that templates are applied automatically to lessons and units for consistent planning:
In the database, click on the top right blue arrow and choose the respective template (e.g., "New Lesson" or "New Unit").
This way, when you create a new lesson unit or a new lesson, the template is applied by default.
Templates simplify your lesson planning process, ensuring uniformity and efficiency. They provide a structured framework to work from and save you time in creating repetitive elements. In the next section, we'll explore further enhancements to your Notion lesson planner.
Section 6: Sorting and Viewing Your Planner
In this section, we'll explore techniques to improve how you sort and view your Notion-based lesson planner. Efficient sorting and visualization are essential for a well-organized and user-friendly workspace.

Step 1: Sorting Lessons by Date
One of the key benefits of digital lesson planning is the ability to sort by date.
To ensure that lessons are displayed in chronological order:
Navigate to your "Lessons" database and click on "sort."
Select "sort by date" to have lessons organized by their scheduled dates.
This keeps upcoming lessons easily accessible at the top of your database.
Step 2: Utilizing Calendar Views
Calendar views offer a visual overview of your lesson curriculum over time:
Go to your "Lessons" database, click on "copy link," and give it a title like "Calendar."
Access the layout options and select the "calendar view."
Your lessons will now be displayed on a calendar, making it easier to plan and visualize your teaching schedule.
Step 3: Streamlining Lesson Status Updates
Keep your lesson planner up to date by ensuring that changes in lesson status are reflected promptly:
Assign "done" or "archive" statuses to completed lessons directly from the calendar view.
By changing a lesson's status to "archive," it will be removed from the calendar, maintaining a clean and uncluttered workspace.
With these steps, you've improved the usability of your Notion lesson planner. Sorting lessons by date and utilizing calendar views provide a clear overview of your teaching schedule. Keeping your lesson statuses updated ensures that your planner remains accurate and up to date.
After years of teaching and lesson planning, this combination of spreadsheet-style organization and visual calendar views, along with the lesson unit folders, provides an efficient and headache-free way to manage your lessons. Notion's archive system also allows you to track and save lesson resources while keeping your workspace clean and easy to navigate.
For those interested in trying out the template created in this guide, a download link is available here.
Download Free Notion Lesson Planner
If you have any questions or would like further guidance on using Notion for teaching, please feel free to contact us. Thank you for joining us on this journey to improve your teaching through Notion!
Ultimate Teacher Planner
The ultimate all-in-one education management system in Notion.
Learn More

Ultimate Teacher Planner
The ultimate all-in-one education management system in Notion.
Learn More

Ultimate Teacher Planner
The ultimate all-in-one education management system in Notion.
Learn More

2024 Notion4Teachers. All Rights Reserved.
2024 Notion4Teachers. All Rights Reserved.
2024 Notion4Teachers. All Rights Reserved.
2024 Notion4Teachers. All Rights Reserved.
