Free Resource Manager
Store and find your teaching resources fast and stress-free. Get it free!
Manage Your Educational Resources in One Notion Database
Manage Your Educational Resources in One Notion Database
Manage Your Educational Resources in One Notion Database

Article by
Milo
ESL Content Coordinator & Educator
ESL Content Coordinator & Educator
All Posts
Free Resource Manager
Store and find your teaching resources fast and stress-free. Get it free!
Free Resource Manager
Store and find your teaching resources fast and stress-free. Get it free!
Free Resource Manager
Store and find your teaching resources fast and stress-free. Get it free!
The Challenge of Organizing Educational Resources
Ever feel like you're drowning in digital files, PDFs, sticky notes, and forty-five versions of the same lesson plan? You're not alone. For most educators, organizing teaching materials feels like trying to fold a fitted sheet—possible, but never quite perfect.
Let’s face it: teaching comes with a mountain of materials. From unit plans and worksheets to video links, assessments, and student data, the volume grows quickly and constantly. Managing all of that while, you know, actually teaching, can feel like an impossible task.
The Clutter is Real
Educators wear a lot of hats—planner, instructor, coach, mentor, tech support (Zoom classes, anyone?). So keeping track of all the resources isn’t just about cleanliness. It’s about survival.
Here’s how messy—not just physically, but digitally—things can get:
Files scattered across Google Drive, Dropbox, and your desktop
Important links buried in old emails or chat threads
Sticky notes with curriculum ideas stuck onto your laptop, whiteboard, or your dog (accidentally, of course)
Duplicate versions of lesson plans with names like “Lesson Plan FINAL,” “Lesson Plan FINAL FINAL,” and “Lesson Plan FINAL FINAL FOR REAL THIS TIME”
Trying to find the right file at the right time during a busy school day? Frustrating. Making last-minute copies only to realize you printed the wrong version? Even more so.
It Costs More Than Just Time
This disorganization isn’t just annoying—it takes a toll. Wasted minutes add up, and stress levels rise every time you're scrambling to find what you need.
Think about this:
Teachers spend an average of 5–7 hours per week just searching for or recreating resources. That’s almost a full workday lost each week.
Poor organization can lead to inconsistent instruction. Imagine teaching the same unit to different classes in completely different ways simply because you couldn’t find your original plan.
It can even affect your students. If materials aren't easily accessible or properly aligned with your goals, the learning experience can suffer.
A real-life example? Take Mr. James, a high school history teacher. He had years' worth of rich lesson plans, assessments, and student projects—but they were stored in seven different folders, three email threads, and a mystery USB drive. One day, he misplaced a crucial primary source document the night before a crucial lesson. The result? A last-minute substitute worksheet and disappointed students.
It Doesn't Have to Be This Way
The good news? This chaos isn’t your destiny. With a little structure and the right tools, you can transform your mountain of resources into a streamlined system that actually works for you—not against you.
Imagine:
Opening one page and instantly seeing what you need for the week
Saving new ideas the moment they strike (without losing them)
Never having to say, “Where did I put that?” again
Ready to see how it's possible? Let’s explore why simplifying your teaching resources isn’t just helpful—it’s essential. And more importantly, how to actually do it.
Up next: why streamlining resource management can save your time, energy, and maybe even your Sunday afternoon nap.
The Importance of Streamlining Resource Management for Teachers
Ever spent 15 minutes digging through your email for that one worksheet you swore you saved last week? Or maybe you’ve printed the same reading passage—twice—because it disappeared somewhere in your Google Drive labyrinth? You’re not alone. Teaching is tough enough without the Where did I put that again? scavenger hunt.
That’s why streamlining your resource management isn’t just a “nice-to-have”—it’s essential.
Why Disorganization Hurts More Than You Think
We know teaching involves juggling 12 things at once: lesson plans, parent emails, grading, behavior tracking, sub notes, snacks (for you and your students)… the list goes on. When your resources are scattered across devices, drives, and folders named "Misc. – Do Not Delete," daily tasks feel 10x harder.
Here’s what disorganized resources can lead to:
Wasted time. You lose hours every week hunting for files.
Missed opportunities. You might forget that perfect activity you made last year.
Stress and burnout. Cluttered systems create mental clutter too.
Inconsistent lessons. When materials are scattered, it’s easy to overlook standards or pacing.
A messy system doesn’t mean you’re a bad teacher—it means you need a better toolbelt. Think of streamlined resource management as the digital filing cabinet your brain will thank you for.
The Perks of Streamlining Your Resources
When you finally get all your files, links, templates, and ideas under one digital roof, amazing things happen:
✅ More time to teach (and breathe). You’ll find what you need in seconds—not after your third cup of coffee.
✅ Better planning. You can quickly reference and reuse assignments, activities, and weekly plans.
✅ Greater consistency and growth. Looking back at previous lessons helps you improve over time.
✅ Faster sub prep. Organized resources = emergency lesson ready with a few clicks.
✅ Peace of mind. You know where everything lives—and so does your future self.
Imagine opening your laptop and seeing your whole teaching world in one list: unit plans, PDFs, video links, assessments—sorted, searchable, and stress-free. That’s the beauty of streamlining.
Real-Life Example: Meet Ms. Garcia
Ms. Garcia teaches 10th grade English. Before organizing her resources, she had lesson outlines in Word, essay rubrics in PDFs, and bell-ringers somewhere on her phone’s Notes app. She spent her Sundays cobbling together materials that were already made—just misplaced.
After setting up a single system (we’ll show you how next), she was able to:
Reuse last year’s poetry unit—without rewriting anything.
Easily drop a link to today’s lesson into Google Classroom.
Prep her classroom library check-out sheet for parent night in 10 minutes flat.
Now she actually reads during her prep time. Shocking, right?
From Chaos to Clarity
Streamlining isn’t about being perfect—it’s about making things easier one file, link, or lesson at a time. When you remove the daily chaos of searching, guessing, and re-making, you gain back the brain space to do what you love: connect, teach, and inspire.
Next up, we’ll talk about the perfect tool to help you untangle all those teaching materials without breaking a sweat. (Hint: it’s colorful, customizable, and might just become your new favorite app.)

How Notion Simplifies Resource Management for Educators
Ever spent 20 minutes digging through your desktop folders looking for that one amazing worksheet you swore you'd saved? Or maybe you’ve printed lesson plans twice because you forgot they were already in your email. If that sounds familiar, you’re not alone—and Notion might just be your organizational lifesaver.
Notion is like the Swiss Army knife of productivity tools. But what makes it truly special for educators is how flexible it is. Whether you're teaching middle school science or managing a high school drama club, Notion lets you keep everything—from unit plans to YouTube links—in one tidy (and dare we say, pretty) place.
Want to skip ahead? You can download the free template here.
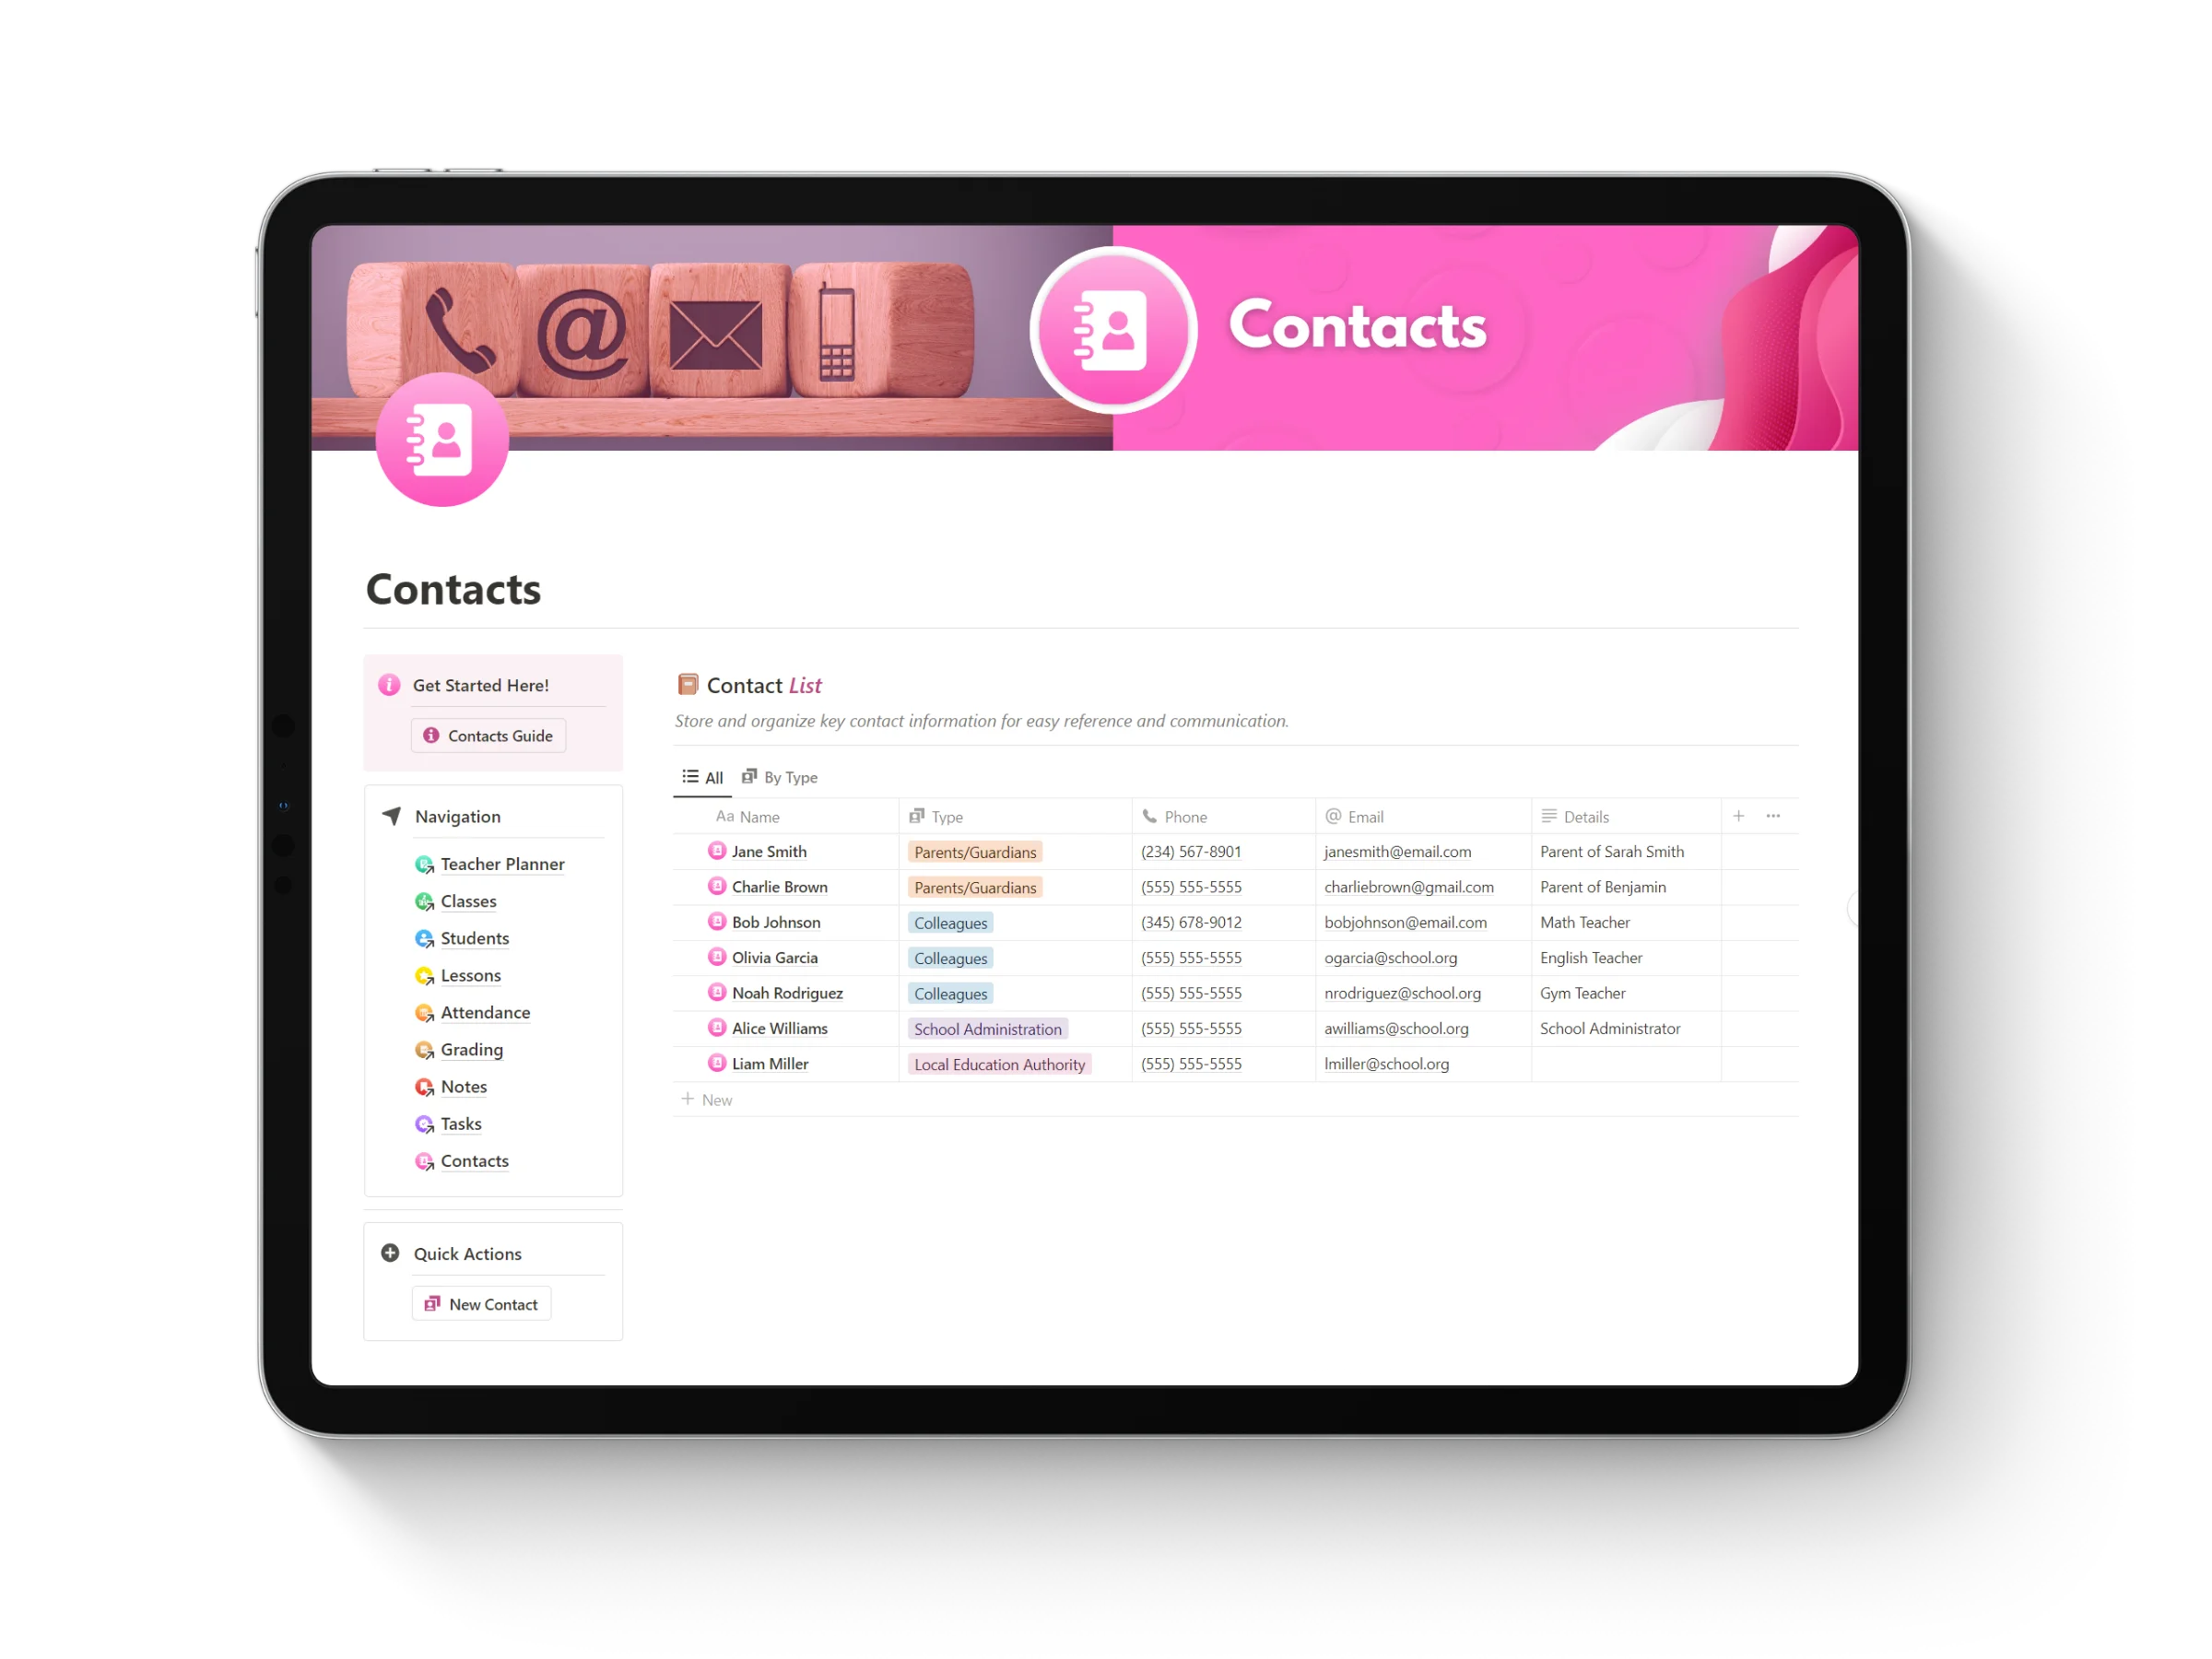
All-In-One Workspace? Yes, Please!
Teachers juggle a lot: assignments, lesson plans, student info, online resources, PD notes, and more. Instead of using a dozen different apps or sticky notes on your monitor, Notion lets you centralize everything.
Here’s what that looks like:
Lesson Plans: Use toggle lists to hide lesson details until you need them. That way, you aren’t scrolling forever.
Resources Library: Create a master list of articles, PDFs, YouTube videos, and websites for each unit.
Weekly Schedule: Build a digital planner page and drag tasks or links into each day.
Personal Notes: Yes, even those scribbled thoughts during a staff meeting can live here.
Think of it as your digital teaching binder—but smarter.
Make It Your Own (Without a Degree in Graphic Design)
Unlike rigid systems, Notion works how you work. Want to color-code your content areas? Go for it. Prefer to organize by unit, month, or teaching standard? Done.
You can structure information using:
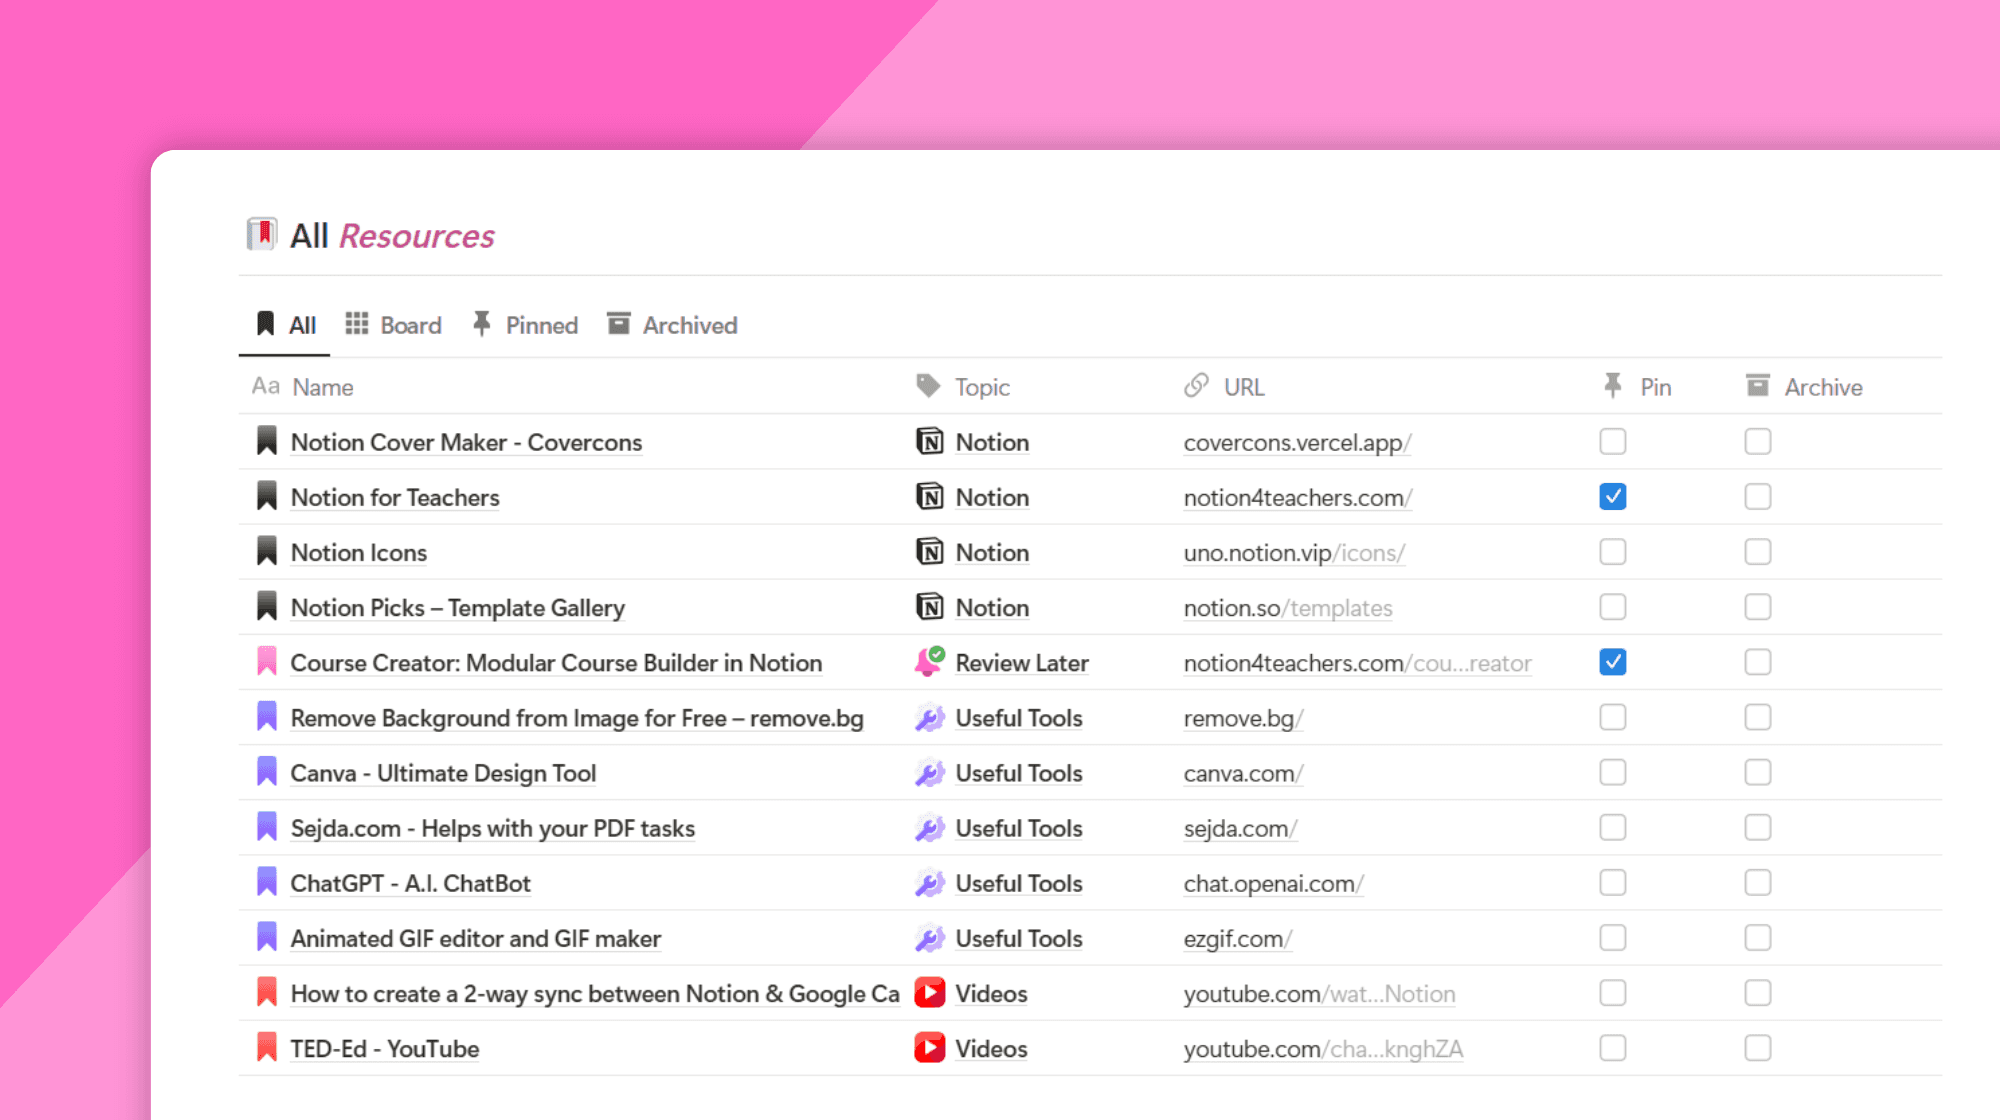
Databases – These are like super-powered spreadsheets. You can sort by subject, tag by grade level, and even add checkboxes.
Pages and Sub-pages – Great for keeping things nested and clean. Think of your main “Science Resources” page breaking down into Earth Science, Chemistry, and Biology.
Templates – Once you build a lesson plan page you love, turn it into a reusable template.
Best of all? You can drag and drop everything. No complicated tech gymnastics required.
Collaboration Made Simple
Teaching doesn't happen in a bubble. If you plan with a team or co-teach a subject, Notion’s collaboration tools are a game-changer.
Share pages with colleagues in just a click. Whether it’s your entire curriculum map or a cool infographic, they can view or edit instantly.
Real-time updates mean no more emailing back and forth versions of lesson plans.
You can even add comments on specific blocks, like “Let’s switch this activity to a group project next time?”
It’s like Google Docs and a planning binder had a very organized baby.
Bottom line? Notion helps you spend less time searching through chaos and more time doing what you love—teaching. And the best part is, it adapts to you, not the other way around.
Ready to see how to actually set all this up? Let’s walk through the steps to organize your resources like a pro in Notion.
Steps to Organize Your Resources in Notion
Ever found yourself 15 minutes before class, frantically scrolling through folders with names like “stuff,” “unit2-final-final,” or “misc”? You’re not alone. Organizing lesson plans, handouts, and reference links can feel like trying to stack Jenga blocks during an earthquake. That’s where Notion steps in—calm, collected, and ready to help you sort out the chaos.
Here’s how to get all of your teaching resources beautifully organized in Notion—without needing a degree in software engineering.
Want to skip ahead? You can download the free template here.
1. Decide What You Want to Organize
Before you dive in, take a breath and ask yourself: “What kind of resources do I use most?”
You might want to organize:
Lesson plans
Worksheets and handouts
Slide decks and visuals
Resource links (great YouTube videos, PDFs, websites)
Student feedback or classroom ideas
Try starting with just one category—like lesson plans for one subject. You can always build from there.
2. Set Up a New Page in Notion
Now let’s build the foundation.
Open Notion and click “+ New Page” in your sidebar.
Name your page something like “Resource Library” or get creative—“Teacher Vault,” anyone?
Choose the “Table” option to create a clean, sortable layout.
Think of it like a digital binder. But waaay prettier and way less heavy.

3. Customize Your Table to Fit Your Needs
This is where Notion starts to shine. Create columns in your table that match how your brain works.
Some ideas:
Title – Name of the file or lesson (ex: "Photosynthesis Lab Guide")
Subject – Science, Math, English, etc.
Type – Is it a Google Doc? Worksheet? Video?
Status – Draft, Ready to Use, Needs Revision
Link or File Upload – Paste a link or upload documents right into Notion
Tags – Unit names, grade levels, skills (you can filter and sort later!)
Suddenly, you’ve got a searchable, editable, and totally organized digital filing cabinet.

4. Use Templates to Save Time
Once you’ve set up one entry you love, turn it into a template!
Click the three dots in the top right of your database, then select New Template.
Set up a format you can duplicate every time you add a new resource.
For example, you might auto-fill fields like subject or tags for consistency.
5. Add Resources As You Go
Don’t feel like you need to dump everything in at once. That’s a recipe for burnout and possibly tears.
Instead:
Add items little by little—maybe one subject per week.
Get in the habit of saving any new resource straight into Notion so it never gets lost in the download folder again.
Bonus tip: Use the Notion Web Clipper browser extension to save websites and videos directly into your database while you’re surfing the web.
6. Use Views to Make Information Easier to Find
Notion lets you filter and display your info in several ways:
Table view – Great for a detailed list
Gallery view – Awesome for visual learners using image thumbnails
Board view – Like a Kanban board for tracking ideas or lesson status
You could have one view showing just resources for Unit 3, and another showing only high school-level content. Think of it like digital X-ray vision.
By following these steps, you’ll slowly but surely build a system that works for you—not against you. Your future self (the one not searching through 16 “final draft” versions) will thank you.
Ready to take it even further? In the next section, you’ll find a completely free Notion template designed just for busy teachers like you. Let’s make organizing feel less like a chore and more like a secret superpower.
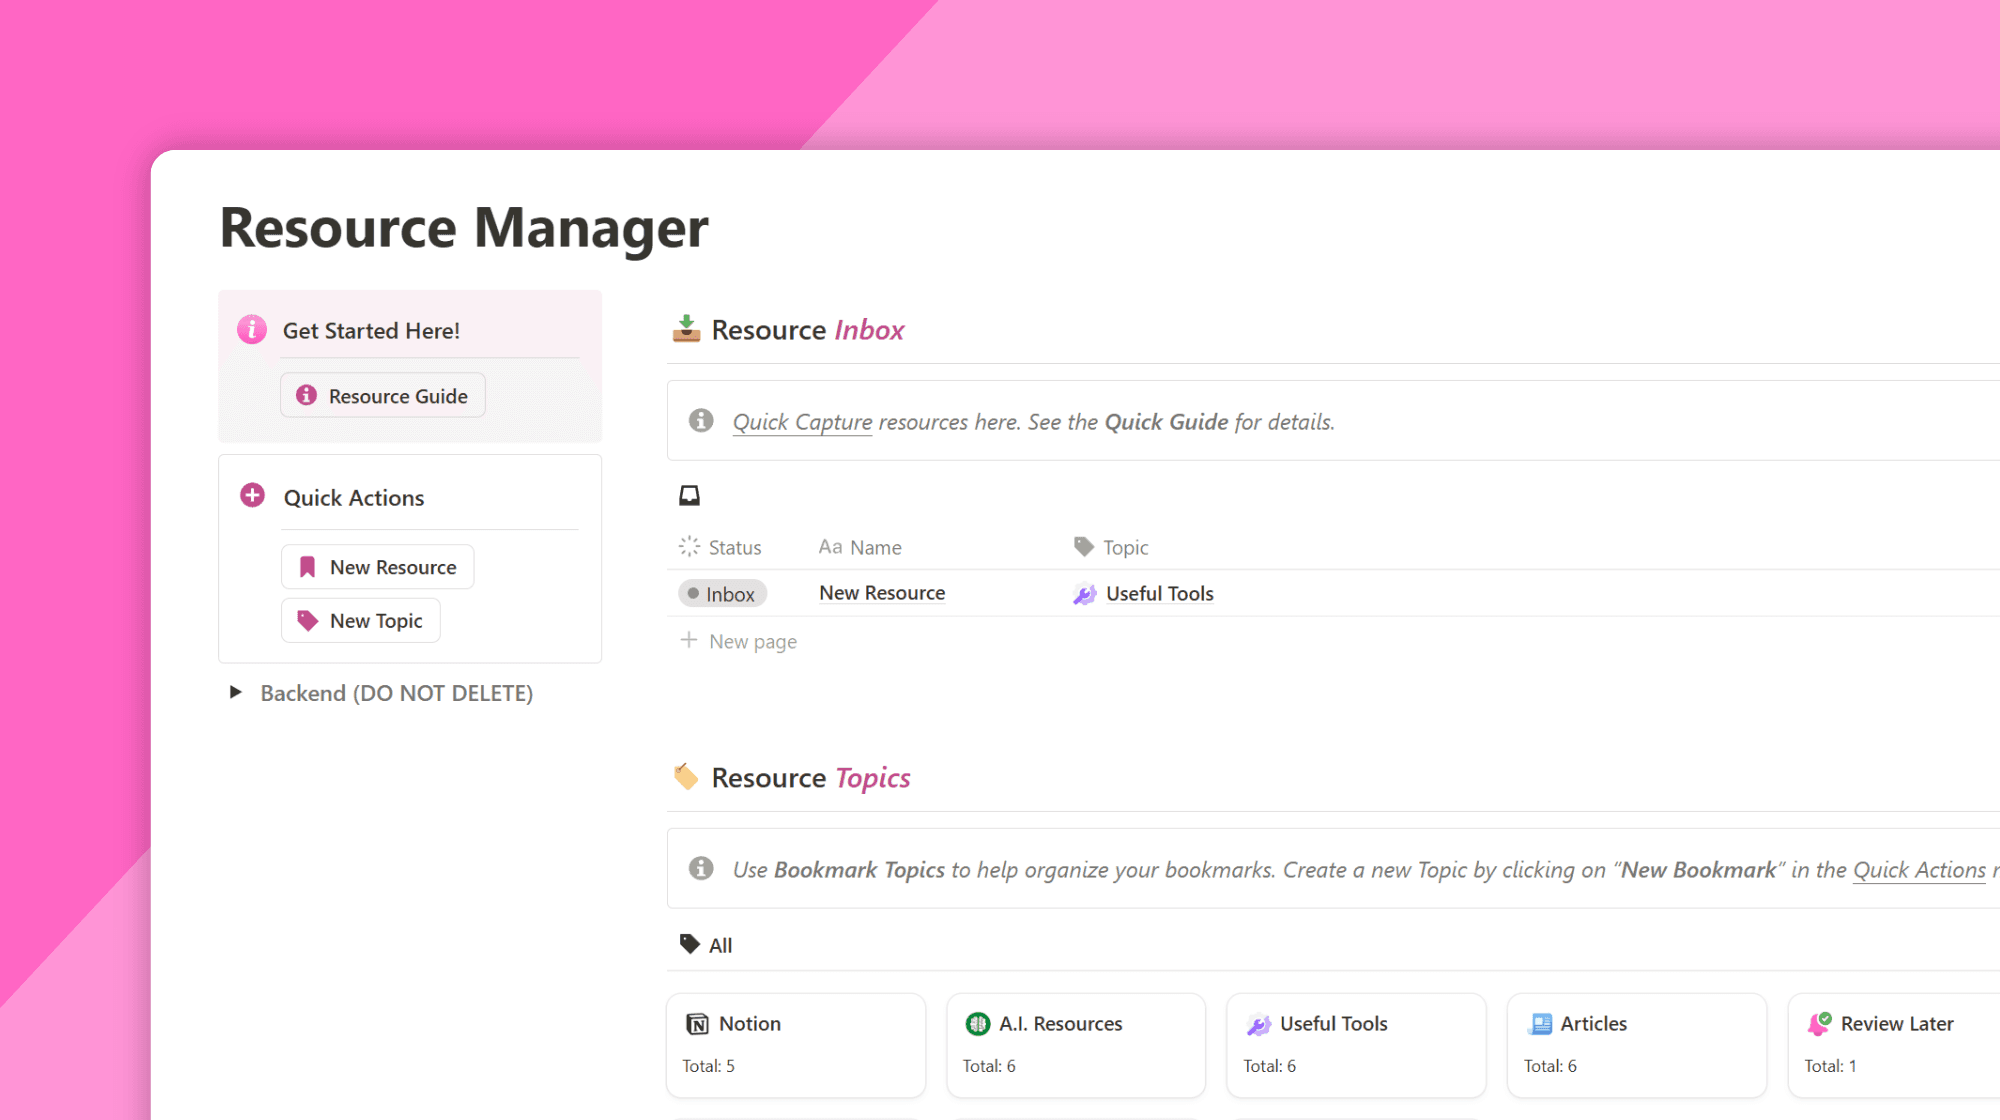
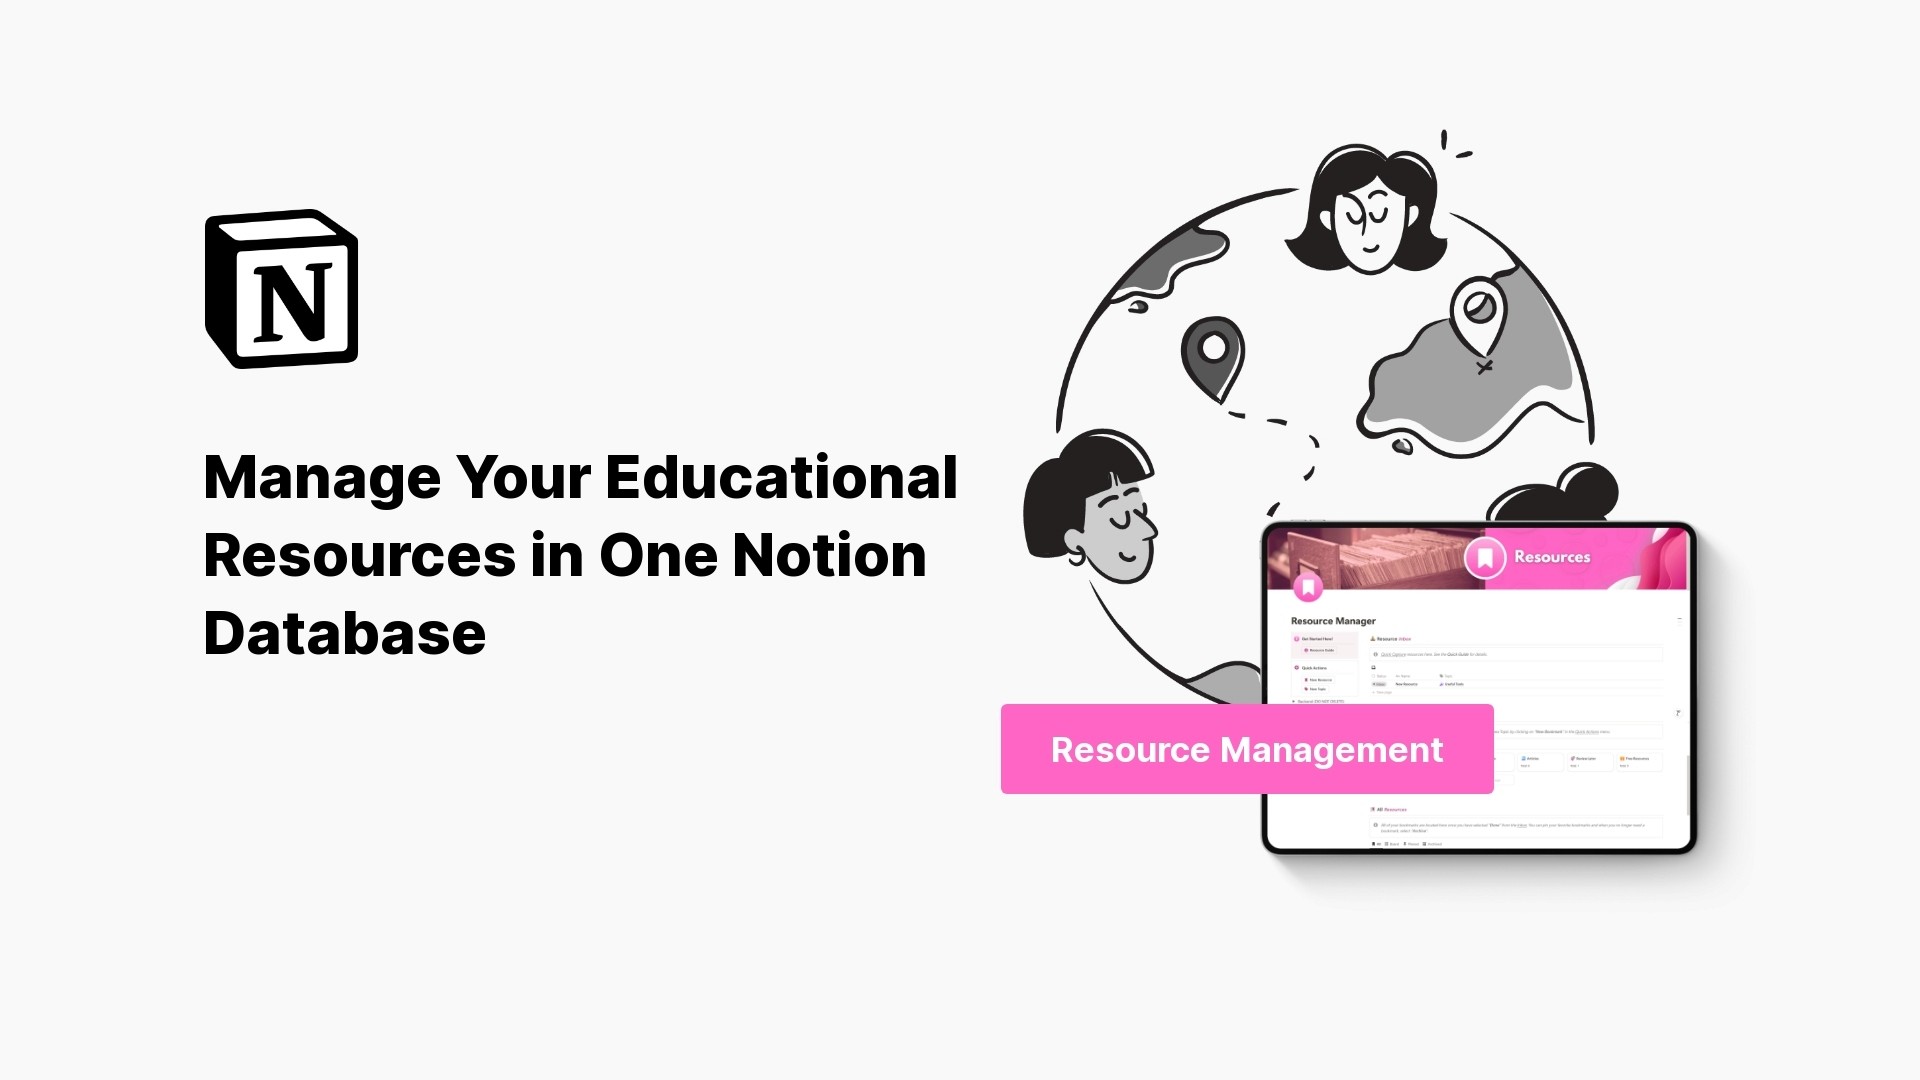
Download Your Free Notion Resource Management Template
Ever spent fifteen minutes digging through emails, folders, and old documents just to find that one activity sheet? You're definitely not alone. Teachers are juggling so much already — from lesson planning to grading and keeping parents in the loop — that finding ways to save time and stress is a game-changer. That’s where our free Notion Resource Management Template comes in.
How to Get the Template
Grabbing your free template is simple:
Click the Download Link 👉 Free Resource Manager Template Download
Open it in your Notion account (you’ll need a free Notion account if you don’t have one already).
Hit "Duplicate" in the top right to copy it to your workspace.
Start adding your resources right away!
You’ll be organizing in no time — and yes, it’s that easy.
What’s In the Template?
Here’s what you’ll get when you download the free template:
Pre-built resource library: Organize files, links, PDFs, videos, and more.
Tagging system: Label materials by subject, grade level, week, or learning objective for super-fast searching.
Lesson plan vault: Store past and current lessons so nothing gets lost in the shuffle.
Reuse-ready layout: Easily duplicate and adapt lessons or units for future years.
Customizable categories: Personalize to fit your style — whether you teach high school calculus or third-grade reading.
It’s like having your very own digital teaching assistant, minus the coffee breaks.
Why You'll Love Using It
Many teachers say this template becomes their go-to hub for planning and prep. Here's why:
No more scattered resources. Everything lives in one place, synced across your devices.
Start fast. With plug-and-play sections, there's no learning curve.
Feel in control. When your materials are organized, you show up more prepared — and a little less tired.
Picture this: It’s the night before a busy Monday. You open your Notion dashboard and — ta-da! — everything you need for the week is sorted and waiting. That’s the kind of peace of mind this template offers.
Bonus Tips to Make It Work for You
Want to get even more bang for your zero bucks?
Drop your most-used websites and tools right into the template.
Link student submissions or examples from your Google Drive.
Create checklists for prep tasks or supplies for each lesson.
You’ll quickly find it’s not just a place to store things — it becomes your daily launchpad.
Click the Download Link 👉 Free Resource Manager Template Download
The Challenge of Organizing Educational Resources
Ever feel like you're drowning in digital files, PDFs, sticky notes, and forty-five versions of the same lesson plan? You're not alone. For most educators, organizing teaching materials feels like trying to fold a fitted sheet—possible, but never quite perfect.
Let’s face it: teaching comes with a mountain of materials. From unit plans and worksheets to video links, assessments, and student data, the volume grows quickly and constantly. Managing all of that while, you know, actually teaching, can feel like an impossible task.
The Clutter is Real
Educators wear a lot of hats—planner, instructor, coach, mentor, tech support (Zoom classes, anyone?). So keeping track of all the resources isn’t just about cleanliness. It’s about survival.
Here’s how messy—not just physically, but digitally—things can get:
Files scattered across Google Drive, Dropbox, and your desktop
Important links buried in old emails or chat threads
Sticky notes with curriculum ideas stuck onto your laptop, whiteboard, or your dog (accidentally, of course)
Duplicate versions of lesson plans with names like “Lesson Plan FINAL,” “Lesson Plan FINAL FINAL,” and “Lesson Plan FINAL FINAL FOR REAL THIS TIME”
Trying to find the right file at the right time during a busy school day? Frustrating. Making last-minute copies only to realize you printed the wrong version? Even more so.
It Costs More Than Just Time
This disorganization isn’t just annoying—it takes a toll. Wasted minutes add up, and stress levels rise every time you're scrambling to find what you need.
Think about this:
Teachers spend an average of 5–7 hours per week just searching for or recreating resources. That’s almost a full workday lost each week.
Poor organization can lead to inconsistent instruction. Imagine teaching the same unit to different classes in completely different ways simply because you couldn’t find your original plan.
It can even affect your students. If materials aren't easily accessible or properly aligned with your goals, the learning experience can suffer.
A real-life example? Take Mr. James, a high school history teacher. He had years' worth of rich lesson plans, assessments, and student projects—but they were stored in seven different folders, three email threads, and a mystery USB drive. One day, he misplaced a crucial primary source document the night before a crucial lesson. The result? A last-minute substitute worksheet and disappointed students.
It Doesn't Have to Be This Way
The good news? This chaos isn’t your destiny. With a little structure and the right tools, you can transform your mountain of resources into a streamlined system that actually works for you—not against you.
Imagine:
Opening one page and instantly seeing what you need for the week
Saving new ideas the moment they strike (without losing them)
Never having to say, “Where did I put that?” again
Ready to see how it's possible? Let’s explore why simplifying your teaching resources isn’t just helpful—it’s essential. And more importantly, how to actually do it.
Up next: why streamlining resource management can save your time, energy, and maybe even your Sunday afternoon nap.
The Importance of Streamlining Resource Management for Teachers
Ever spent 15 minutes digging through your email for that one worksheet you swore you saved last week? Or maybe you’ve printed the same reading passage—twice—because it disappeared somewhere in your Google Drive labyrinth? You’re not alone. Teaching is tough enough without the Where did I put that again? scavenger hunt.
That’s why streamlining your resource management isn’t just a “nice-to-have”—it’s essential.
Why Disorganization Hurts More Than You Think
We know teaching involves juggling 12 things at once: lesson plans, parent emails, grading, behavior tracking, sub notes, snacks (for you and your students)… the list goes on. When your resources are scattered across devices, drives, and folders named "Misc. – Do Not Delete," daily tasks feel 10x harder.
Here’s what disorganized resources can lead to:
Wasted time. You lose hours every week hunting for files.
Missed opportunities. You might forget that perfect activity you made last year.
Stress and burnout. Cluttered systems create mental clutter too.
Inconsistent lessons. When materials are scattered, it’s easy to overlook standards or pacing.
A messy system doesn’t mean you’re a bad teacher—it means you need a better toolbelt. Think of streamlined resource management as the digital filing cabinet your brain will thank you for.
The Perks of Streamlining Your Resources
When you finally get all your files, links, templates, and ideas under one digital roof, amazing things happen:
✅ More time to teach (and breathe). You’ll find what you need in seconds—not after your third cup of coffee.
✅ Better planning. You can quickly reference and reuse assignments, activities, and weekly plans.
✅ Greater consistency and growth. Looking back at previous lessons helps you improve over time.
✅ Faster sub prep. Organized resources = emergency lesson ready with a few clicks.
✅ Peace of mind. You know where everything lives—and so does your future self.
Imagine opening your laptop and seeing your whole teaching world in one list: unit plans, PDFs, video links, assessments—sorted, searchable, and stress-free. That’s the beauty of streamlining.
Real-Life Example: Meet Ms. Garcia
Ms. Garcia teaches 10th grade English. Before organizing her resources, she had lesson outlines in Word, essay rubrics in PDFs, and bell-ringers somewhere on her phone’s Notes app. She spent her Sundays cobbling together materials that were already made—just misplaced.
After setting up a single system (we’ll show you how next), she was able to:
Reuse last year’s poetry unit—without rewriting anything.
Easily drop a link to today’s lesson into Google Classroom.
Prep her classroom library check-out sheet for parent night in 10 minutes flat.
Now she actually reads during her prep time. Shocking, right?
From Chaos to Clarity
Streamlining isn’t about being perfect—it’s about making things easier one file, link, or lesson at a time. When you remove the daily chaos of searching, guessing, and re-making, you gain back the brain space to do what you love: connect, teach, and inspire.
Next up, we’ll talk about the perfect tool to help you untangle all those teaching materials without breaking a sweat. (Hint: it’s colorful, customizable, and might just become your new favorite app.)
How Notion Simplifies Resource Management for Educators
Ever spent 20 minutes digging through your desktop folders looking for that one amazing worksheet you swore you'd saved? Or maybe you’ve printed lesson plans twice because you forgot they were already in your email. If that sounds familiar, you’re not alone—and Notion might just be your organizational lifesaver.
Notion is like the Swiss Army knife of productivity tools. But what makes it truly special for educators is how flexible it is. Whether you're teaching middle school science or managing a high school drama club, Notion lets you keep everything—from unit plans to YouTube links—in one tidy (and dare we say, pretty) place.
Want to skip ahead? You can download the free template here.
All-In-One Workspace? Yes, Please!
Teachers juggle a lot: assignments, lesson plans, student info, online resources, PD notes, and more. Instead of using a dozen different apps or sticky notes on your monitor, Notion lets you centralize everything.
Here’s what that looks like:
Lesson Plans: Use toggle lists to hide lesson details until you need them. That way, you aren’t scrolling forever.
Resources Library: Create a master list of articles, PDFs, YouTube videos, and websites for each unit.
Weekly Schedule: Build a digital planner page and drag tasks or links into each day.
Personal Notes: Yes, even those scribbled thoughts during a staff meeting can live here.
Think of it as your digital teaching binder—but smarter.
Make It Your Own (Without a Degree in Graphic Design)
Unlike rigid systems, Notion works how you work. Want to color-code your content areas? Go for it. Prefer to organize by unit, month, or teaching standard? Done.
You can structure information using:
Databases – These are like super-powered spreadsheets. You can sort by subject, tag by grade level, and even add checkboxes.
Pages and Sub-pages – Great for keeping things nested and clean. Think of your main “Science Resources” page breaking down into Earth Science, Chemistry, and Biology.
Templates – Once you build a lesson plan page you love, turn it into a reusable template.
Best of all? You can drag and drop everything. No complicated tech gymnastics required.
Collaboration Made Simple
Teaching doesn't happen in a bubble. If you plan with a team or co-teach a subject, Notion’s collaboration tools are a game-changer.
Share pages with colleagues in just a click. Whether it’s your entire curriculum map or a cool infographic, they can view or edit instantly.
Real-time updates mean no more emailing back and forth versions of lesson plans.
You can even add comments on specific blocks, like “Let’s switch this activity to a group project next time?”
It’s like Google Docs and a planning binder had a very organized baby.
Bottom line? Notion helps you spend less time searching through chaos and more time doing what you love—teaching. And the best part is, it adapts to you, not the other way around.
Ready to see how to actually set all this up? Let’s walk through the steps to organize your resources like a pro in Notion.
Steps to Organize Your Resources in Notion
Ever found yourself 15 minutes before class, frantically scrolling through folders with names like “stuff,” “unit2-final-final,” or “misc”? You’re not alone. Organizing lesson plans, handouts, and reference links can feel like trying to stack Jenga blocks during an earthquake. That’s where Notion steps in—calm, collected, and ready to help you sort out the chaos.
Here’s how to get all of your teaching resources beautifully organized in Notion—without needing a degree in software engineering.
Want to skip ahead? You can download the free template here.
1. Decide What You Want to Organize
Before you dive in, take a breath and ask yourself: “What kind of resources do I use most?”
You might want to organize:
Lesson plans
Worksheets and handouts
Slide decks and visuals
Resource links (great YouTube videos, PDFs, websites)
Student feedback or classroom ideas
Try starting with just one category—like lesson plans for one subject. You can always build from there.
2. Set Up a New Page in Notion
Now let’s build the foundation.
Open Notion and click “+ New Page” in your sidebar.
Name your page something like “Resource Library” or get creative—“Teacher Vault,” anyone?
Choose the “Table” option to create a clean, sortable layout.
Think of it like a digital binder. But waaay prettier and way less heavy.
3. Customize Your Table to Fit Your Needs
This is where Notion starts to shine. Create columns in your table that match how your brain works.
Some ideas:
Title – Name of the file or lesson (ex: "Photosynthesis Lab Guide")
Subject – Science, Math, English, etc.
Type – Is it a Google Doc? Worksheet? Video?
Status – Draft, Ready to Use, Needs Revision
Link or File Upload – Paste a link or upload documents right into Notion
Tags – Unit names, grade levels, skills (you can filter and sort later!)
Suddenly, you’ve got a searchable, editable, and totally organized digital filing cabinet.
4. Use Templates to Save Time
Once you’ve set up one entry you love, turn it into a template!
Click the three dots in the top right of your database, then select New Template.
Set up a format you can duplicate every time you add a new resource.
For example, you might auto-fill fields like subject or tags for consistency.
5. Add Resources As You Go
Don’t feel like you need to dump everything in at once. That’s a recipe for burnout and possibly tears.
Instead:
Add items little by little—maybe one subject per week.
Get in the habit of saving any new resource straight into Notion so it never gets lost in the download folder again.
Bonus tip: Use the Notion Web Clipper browser extension to save websites and videos directly into your database while you’re surfing the web.
6. Use Views to Make Information Easier to Find
Notion lets you filter and display your info in several ways:
Table view – Great for a detailed list
Gallery view – Awesome for visual learners using image thumbnails
Board view – Like a Kanban board for tracking ideas or lesson status
You could have one view showing just resources for Unit 3, and another showing only high school-level content. Think of it like digital X-ray vision.
By following these steps, you’ll slowly but surely build a system that works for you—not against you. Your future self (the one not searching through 16 “final draft” versions) will thank you.
Ready to take it even further? In the next section, you’ll find a completely free Notion template designed just for busy teachers like you. Let’s make organizing feel less like a chore and more like a secret superpower.
Download Your Free Notion Resource Management Template
Ever spent fifteen minutes digging through emails, folders, and old documents just to find that one activity sheet? You're definitely not alone. Teachers are juggling so much already — from lesson planning to grading and keeping parents in the loop — that finding ways to save time and stress is a game-changer. That’s where our free Notion Resource Management Template comes in.
How to Get the Template
Grabbing your free template is simple:
Click the Download Link 👉 Free Resource Manager Template Download
Open it in your Notion account (you’ll need a free Notion account if you don’t have one already).
Hit "Duplicate" in the top right to copy it to your workspace.
Start adding your resources right away!
You’ll be organizing in no time — and yes, it’s that easy.
What’s In the Template?
Here’s what you’ll get when you download the free template:
Pre-built resource library: Organize files, links, PDFs, videos, and more.
Tagging system: Label materials by subject, grade level, week, or learning objective for super-fast searching.
Lesson plan vault: Store past and current lessons so nothing gets lost in the shuffle.
Reuse-ready layout: Easily duplicate and adapt lessons or units for future years.
Customizable categories: Personalize to fit your style — whether you teach high school calculus or third-grade reading.
It’s like having your very own digital teaching assistant, minus the coffee breaks.
Why You'll Love Using It
Many teachers say this template becomes their go-to hub for planning and prep. Here's why:
No more scattered resources. Everything lives in one place, synced across your devices.
Start fast. With plug-and-play sections, there's no learning curve.
Feel in control. When your materials are organized, you show up more prepared — and a little less tired.
Picture this: It’s the night before a busy Monday. You open your Notion dashboard and — ta-da! — everything you need for the week is sorted and waiting. That’s the kind of peace of mind this template offers.
Bonus Tips to Make It Work for You
Want to get even more bang for your zero bucks?
Drop your most-used websites and tools right into the template.
Link student submissions or examples from your Google Drive.
Create checklists for prep tasks or supplies for each lesson.
You’ll quickly find it’s not just a place to store things — it becomes your daily launchpad.
Click the Download Link 👉 Free Resource Manager Template Download
Free Resource Manager
Store and find your teaching resources fast and stress-free. Get it free!
Free Resource Manager
Store and find your teaching resources fast and stress-free. Get it free!
Free Resource Manager
Store and find your teaching resources fast and stress-free. Get it free!
Table of Contents
Free Resource Manager
Store and find your teaching resources fast and stress-free. Get it free!


Notion4Teachers
Notion templates to simplify administrative tasks and enhance your teaching experience.

2024 Notion4Teachers. All Rights Reserved.
Notion4Teachers
Notion templates to simplify administrative tasks and enhance your teaching experience.
2024 Notion4Teachers. All Rights Reserved.
Notion4Teachers
Notion templates to simplify administrative tasks and enhance your teaching experience.
2024 Notion4Teachers. All Rights Reserved.
Notion4Teachers
Notion templates to simplify administrative tasks and enhance your teaching experience.
2024 Notion4Teachers. All Rights Reserved.